Redux 핵심, Part 3: Basic Redux Data Flow
- How to add "slices" of reducer logic to the Redux store with
createSlice - Reading Redux data in components with the
useSelectorhook - Dispatching actions in components with the
useDispatchhook
- Familiarity with key Redux terms and concepts like "actions", "reducers", "store", and "dispatching". (See Part 1: Redux Overview and Concepts for explanations of these terms.)
Introduction
In Part 1: Redux Overview and Concepts, we looked at how Redux can help us build maintainable apps by giving us a single central place to put global app state. We also talked about core Redux concepts like dispatching action objects, using reducer functions that return new state values, and writing async logic using thunks. In Part 2: Redux App Structure, we saw how APIs like configureStore and createSlice from Redux Toolkit and Provider and useSelector from React-Redux work together to let us write Redux logic and interact with that logic from our React components.
Now that you have some idea of what these pieces are, it's time to put that knowledge into practice. We're going to build a small social media feed app, which will include a number of features that demonstrate some real-world use cases. This will help you understand how to use Redux in your own applications.
The example app is not meant as a complete production-ready project. The goal is to help you learn the Redux APIs and typical usage patterns, and point you in the right direction using some limited examples. Also, some of the early pieces we build will be updated later on to show better ways to do things. Please read through the whole tutorial to see all the concepts in use.
Project Setup
For this tutorial, we've created a pre-configured starter project that already has React and Redux set up, includes some default styling, and has a fake REST API that will allow us to write actual API requests in our app. You'll use this as the basis for writing the actual application code.
To get started, you can open and fork this CodeSandbox:
You can also clone the same project from this Github repo. After cloning the repo, you can install the tools for the project with npm install, and start it with npm start.
If you'd like to see the final version of what we're going to build, you can check out the tutorial-steps branch, or look at the final version in this CodeSandbox.
We'd like to thank Tania Rascia, whose Using Redux with React tutorial helped inspire the example in this page. It also uses her Primitive UI CSS starter for styling.
Creating a New Redux + React Project
Once you've finished this tutorial, you'll probably want to try working on your own projects. We recommend using the Redux templates for Create-React-App as the fastest way to create a new Redux + React project. It comes with Redux Toolkit and React-Redux already configured, using the same "counter" app example you saw in Part 1. This lets you jump right into writing your actual application code without having to add the Redux packages and set up the store.
If you want to know specific details on how to add Redux to a project, see this explanation:
Detailed Explanation: Adding Redux to a React Project
The Redux template for CRA comes with Redux Toolkit and React-Redux already configured. If you're setting up a new project from scratch without that template, follow these steps:
- Add the
@reduxjs/toolkitandreact-reduxpackages - Create a Redux store using RTK's
configureStoreAPI, and pass in at least one reducer function - Import the Redux store into your application's entry point file (such as
src/index.js) - Wrap your root React component with the
<Provider>component from React-Redux, like:
ReactDOM.render(
  <Provider store={store}>
    <App />
  </Provider>,
  document.getElementById('root')
)
Exploring the Initial Project
Let's take a quick look at what the initial project contains:
/public: the HTML host page template and other static files like icons/srcindex.js: the entry point file for the application. It renders the React-Redux<Provider>component and the main<App>component.App.js: the main application component. Renders the top navbar and handles client-side routing for the other content.index.css: styles for the complete application/apiclient.js: a small AJAX request client that allows us to make GET and POST requestsserver.js: provides a fake REST API for our data. Our app will fetch data from these fake endpoints later.
/appNavbar.js: renders the top header and nav contentstore.js: creates the Redux store instance
If you load the app now, you should see the header and a welcome message. We can also open up the Redux DevTools Extension and see that our initial Redux state is entirely empty.
With that, let's get started!
Main Posts Feed
The main feature for our social media feed app will be a list of posts. We'll add several more pieces to this feature as we go along, but to start off, our first goal is to only show the list of post entries on screen.
Creating the Posts Slice
The first step is to create a new Redux "slice" that will contain the data for our posts. Once we have that data in the Redux store, we can create the React components to show that data on the page.
Inside of src, create a new features folder, put a posts folder inside of features, and add a new file named postsSlice.js.
We're going to use the Redux Toolkit createSlice function to make a reducer function that knows how to handle our posts data. Reducer functions need to have some initial data included so that the Redux store has those values loaded when the app starts up.
For now, we'll create an array with some fake post objects inside so that we can begin adding the UI.
We'll import createSlice, define our initial posts array, pass that to createSlice, and export the posts reducer function that createSlice generated for us:
import { createSlice } from '@reduxjs/toolkit'

const initialState = [
  { id: '1', title: 'First Post!', content: 'Hello!' },
  { id: '2', title: 'Second Post', content: 'More text' }
]

const postsSlice = createSlice({
  name: 'posts',
  initialState,
  reducers: {}
})

export default postsSlice.reducer
Every time we create a new slice, we need to add its reducer function to our Redux store. We already have a Redux store being created, but right now it doesn't have any data inside. Open up app/store.js, import the postsReducer function, and update the call to configureStore so that the postsReducer is being passed as a reducer field named posts:
import { configureStore } from '@reduxjs/toolkit'

import postsReducer from '../features/posts/postsSlice'

export default configureStore({
  reducer: {
    posts: postsReducer
  }
})
This tells Redux that we want our top-level state object to have a field named posts inside, and all the data for state.posts will be updated by the postsReducer function when actions are dispatched.
We can confirm that this works by opening the Redux DevTools Extension and looking at the current state contents:
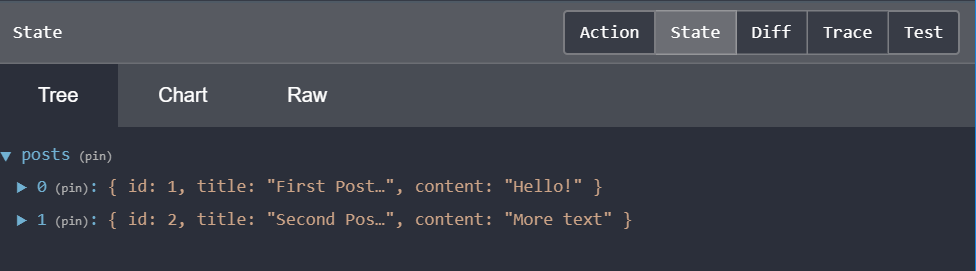
Showing the Posts List
Now that we have some posts data in our store, we can create a React component that shows the list of posts. All of the code related to our feed posts feature should go in the posts folder, so go ahead and create a new file named PostsList.js in there.
If we're going to render a list of posts, we need to get the data from somewhere. React components can read data from the Redux store using the useSelector hook from the React-Redux library. The "selector functions" that you write will be called with the entire Redux state object as a parameter, and should return the specific data that this component needs from the store.
Our initial PostsList component will read the state.posts value from the Redux store, then loop over the array of posts and show each of them on screen:
import React from 'react'
import { useSelector } from 'react-redux'

export const PostsList = () => {
  const posts = useSelector(state => state.posts)

  const renderedPosts = posts.map(post => (
    <article className="post-excerpt" key={post.id}>
      <h3>{post.title}</h3>
      <p className="post-content">{post.content.substring(0, 100)}</p>
    </article>
  ))

  return (
    <section className="posts-list">
      <h2>Posts</h2>
      {renderedPosts}
    </section>
  )
}
We then need to update the routing in App.js so that we show the PostsList component instead of the "welcome" message. Import the PostsList component into App.js, and replace the welcome text with <PostsList />. We'll also wrap it in a React Fragment, because we're going to add something else to the main page soon:
import React from 'react'
import {
  BrowserRouter as Router,
  Switch,
  Route,
  Redirect
} from 'react-router-dom'

import { Navbar } from './app/Navbar'

import { PostsList } from './features/posts/PostsList'

function App() {
  return (
    <Router>
      <Navbar />
      <div className="App">
        <Switch>
          <Route
            exact
            path="/"
            render={() => (
              <React.Fragment>
                <PostsList />
              </React.Fragment>
            )}
          />
          <Redirect to="/" />
        </Switch>
      </div>
    </Router>
  )
}

export default App
Once that's added, the main page of our app should now look like this:
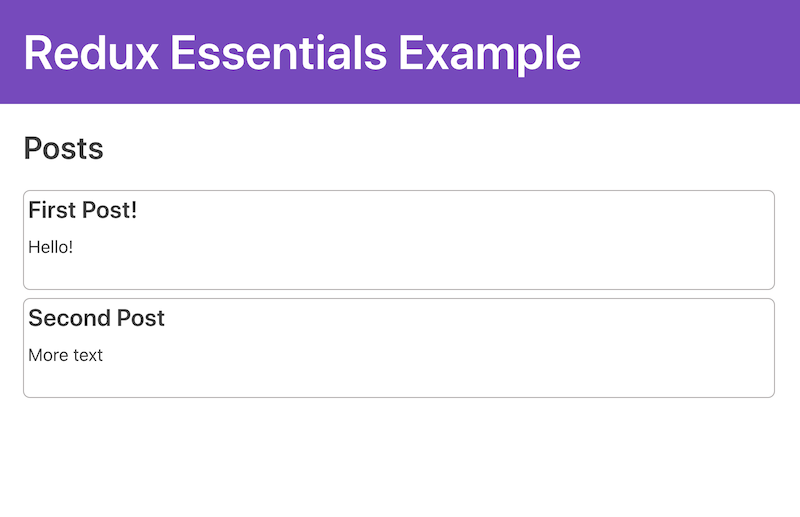
Progress! We've added some data to the Redux store, and shown it on screen in a React component.
Adding New Posts
It's nice to look at posts people have written, but we'd like to be able to write our own posts. Let's create an "Add New Post" form that lets us write posts and save them.
We'll create the empty form first and add it to the page. Then, we'll connect the form to our Redux store so that new posts are added when we click the "Save Post" button.
Adding the New Post Form
Create AddPostForm.js in our posts folder. We'll add a text input for the post title, and a text area for the body of the post:
import React, { useState } from 'react'

export const AddPostForm = () => {
  const [title, setTitle] = useState('')
  const [content, setContent] = useState('')

  const onTitleChanged = e => setTitle(e.target.value)
  const onContentChanged = e => setContent(e.target.value)

  return (
    <section>
      <h2>Add a New Post</h2>
      <form>
        <label htmlFor="postTitle">Post Title:</label>
        <input
          type="text"
          id="postTitle"
          name="postTitle"
          value={title}
          onChange={onTitleChanged}
        />
        <label htmlFor="postContent">Content:</label>
        <textarea
          id="postContent"
          name="postContent"
          value={content}
          onChange={onContentChanged}
        />
        <button type="button">Save Post</button>
      </form>
    </section>
  )
}
Import that component into App.js, and add it right above the <PostsList /> component:
<Route
  exact
  path="/"
  render={() => (
    <React.Fragment>
      <AddPostForm />
      <PostsList />
    </React.Fragment>
  )}
/>
You should see the form show up in the page right below the header.
Saving Post Entries
Now, let's update our posts slice to add new post entries to the Redux store.
Our posts slice is responsible for handling all updates to the posts data. Inside of the createSlice call, there's an object called reducers. Right now, it's empty. We need to add a reducer function inside of there to handle the case of a post being added.
Inside of reducers, add a function named postAdded, which will receive two arguments: the current state value, and the action object that was dispatched. Since the posts slice only knows about the data it's responsible for, the state argument will be the array of posts by itself, and not the entire Redux state object.
The action object will have our new post entry as the action.payload field, and we'll put that new post object into the state array.
When we write the postAdded reducer function, createSlice will automatically generate an "action creator" function with the same name. We can export that action creator and use it in our UI components to dispatch the action when the user clicks "Save Post".
const postsSlice = createSlice({
  name: 'posts',
  initialState,
  reducers: {
    postAdded(state, action) {
      state.push(action.payload)
    }
  }
})

export const { postAdded } = postsSlice.actions

export default postsSlice.reducer
Remember: reducer functions must always create new state values immutably, by making copies! It's safe to call mutating functions like Array.push() or modify object fields like state.someField = someValue inside of createSlice(), because it converts those mutations into safe immutable updates internally using the Immer library, but don't try to mutate any data outside of createSlice!
Dispatching the "Post Added" Action
Our AddPostForm has text inputs and a "Save Post" button, but the button doesn't do anything yet. We need to add a click handler that will dispatch the postAdded action creator and pass in a new post object containing the title and content the user wrote.
Our post objects also need to have an id field. Right now, our initial test posts are using some fake numbers for their IDs. We could write some code that would figure out what the next incrementing ID number should be, but it would be better if we generated a random unique ID instead. Redux Toolkit has a nanoid function we can use for that.
We'll talk more about generating IDs and dispatching actions in Part 4: Using Redux Data.
In order to dispatch actions from a component, we need access to the store's dispatch function. We get this by calling the useDispatch hook from React-Redux. We also need to import the postAdded action creator into this file.
Once we have the dispatch function available in our component, we can call dispatch(postAdded()) in a click handler. We can take the title and content values from our React component useState hooks, generate a new ID, and put them together into a new post object that we pass to postAdded().
import React, { useState } from 'react'
import { useDispatch } from 'react-redux'
import { nanoid } from '@reduxjs/toolkit'

import { postAdded } from './postsSlice'

export const AddPostForm = () => {
  const [title, setTitle] = useState('')
  const [content, setContent] = useState('')

  const dispatch = useDispatch()

  const onTitleChanged = e => setTitle(e.target.value)
  const onContentChanged = e => setContent(e.target.value)

  const onSavePostClicked = () => {
    if (title && content) {
      dispatch(
        postAdded({
          id: nanoid(),
          title,
          content
        })
      )

      setTitle('')
      setContent('')
    }
  }

  return (
    <section>
      <h2>Add a New Post</h2>
      <form>
        {/* omit form inputs */}
        <button type="button" onClick={onSavePostClicked}>
          Save Post
        </button>
      </form>
    </section>
  )
}
Now, try typing in a title and some text, and click "Save Post". You should see a new item for that post show up in the posts list.
Congratulations! You've just built your first working React + Redux app!
This shows the complete Redux data flow cycle:
- Our posts list read the initial set of posts from the store with
useSelectorand rendered the initial UI - We dispatched the
postAddedaction containing the data for the new post entry - The posts reducer saw the
postAddedaction, and updated the posts array with the new entry - The Redux store told the UI that some data had changed
- The posts list read the updated posts array, and re-rendered itself to show the new post
All the new features we'll add after this will follow the same basic patterns you've seen here: adding slices of state, writing reducer functions, dispatching actions, and rendering the UI based on data from the Redux store.
We can check the Redux DevTools Extension to see the action we dispatched, and look at how the Redux state was updated in response to that action. If we click the "posts/postAdded" entry in the actions list, the "Action" tab should look like this:
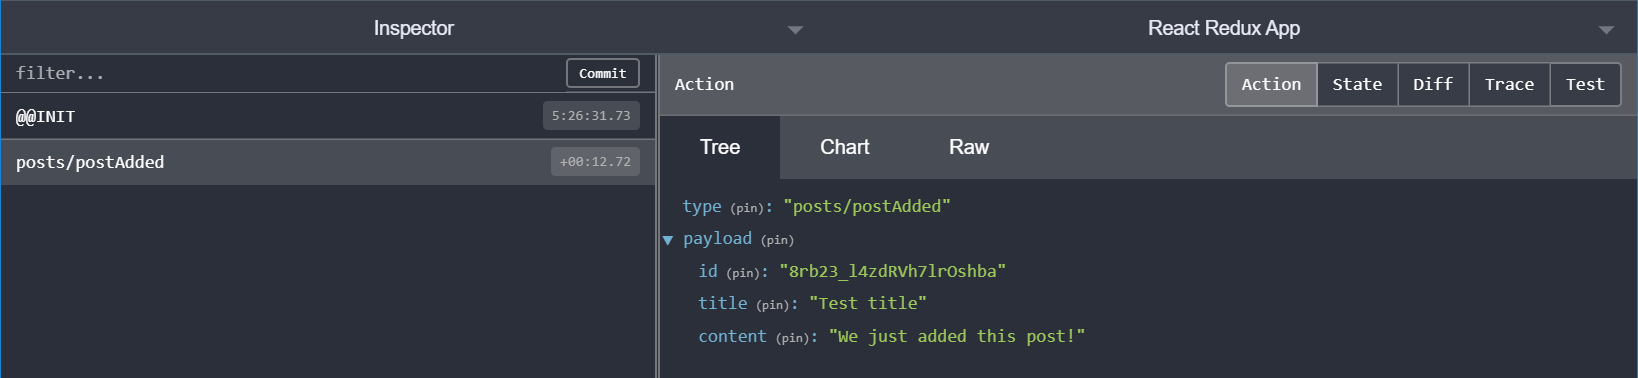
The "Diff" tab should also show us that state.posts had one new item added, which is at index 2.
Notice that our AddPostForm component has some React useState hooks inside, to keep track of the title and content values the user is typing in. Remember, the Redux store should only contain data that's considered "global" for the application! In this case, only the AddPostForm will need to know about the latest values for the input fields, so we want to keep that data in React component state instead of trying to keep the temporary data in the Redux store. When the user is done with the form, we dispatch a Redux action to update the store with the final values based on the user input.
What You've Learned
Let's recap what you've learned in this section:
- Redux state is updated by "reducer functions":
- Reducers always calculate a new state immutably, by copying existing state values and modifying the copies with the new data
- The Redux Toolkit
createSlicefunction generates "slice reducer" functions for you, and lets you write "mutating" code that is turned into safe immutable updates - Those slice reducer functions are added to the
reducerfield inconfigureStore, and that defines the data and state field names inside the Redux store
- React components read data from the store with the
useSelectorhook- Selector functions receive the whole
stateobject, and should return a value - Selectors will re-run whenever the Redux store is updated, and if the data they return has changed, the component will re-render
- Selector functions receive the whole
- React components dispatch actions to update the store using the
useDispatchhookcreateSlicewill generate action creator functions for each reducer we add to a slice- Call
dispatch(someActionCreator())in a component to dispatch an action - Reducers will run, check to see if this action is relevant, and return new state if appropriate
- Temporary data like form input values should be kept as React component state. Dispatch a Redux action to update the store when the user is done with the form.
Here's what the app looks like so far:
What's Next?
Now that you know the basic Redux data flow, move on to Part 4: Using Redux Data, where we'll add some additional functionality to our app and see examples of how to work with the data that's already in the store.