Redux 핵심, Part 6: Performance and Normalizing Data
- How to create memoized selector functions with
createSelector - Patterns for optimizing component rendering performance
- How to use
createEntityAdapterto store and update normalized data
- Completion of Part 5 to understand data fetching flow
Introduction
In Part 5: Async Logic and Data Fetching, we saw how to write async thunks to fetch data from a server API, patterns for handling async request loading state, and use of selector functions for encapsulating lookups of data from the Redux state.
In this section, we'll look at optimized patterns for ensuring good performance in our application, and techniques for automatically handling common updates of data in the store.
So far, most of our functionality has been centered around the posts feature. We're going to add a couple new sections of the app. After those are added, we'll look at some specific details of how we've built things, and talk about some weaknesses with what we've built so far and how we can improve the implementation.
Adding User Pages
We're fetching a list of users from our fake API, and we can choose a user as the author when we add a new post. But, a social media app needs the ability to look at the page for a specific user and see all the posts they've made. Let's add a page to show the list of all users, and another to show all posts by a specific user.
We'll start by adding a new <UsersList> component. It follows the usual pattern of reading some data from the store with useSelector, and mapping over the array to show a list of users with links to their individual pages:
import React from 'react'
import { useSelector } from 'react-redux'
import { Link } from 'react-router-dom'
import { selectAllUsers } from './usersSlice'

export const UsersList = () => {
  const users = useSelector(selectAllUsers)

  const renderedUsers = users.map(user => (
    <li key={user.id}>
      <Link to={`/users/${user.id}`}>{user.name}</Link>
    </li>
  ))

  return (
    <section>
      <h2>Users</h2>

      <ul>{renderedUsers}</ul>
    </section>
  )
}
We don't yet have a selectAllUsers selector, so we'll need to add that to usersSlice.js along with a selectUserById selector:
export default usersSlice.reducer

export const selectAllUsers = state => state.users

export const selectUserById = (state, userId) =>
  state.users.find(user => user.id === userId)
And we'll add a <UserPage>, which is similar to our <SinglePostPage> in taking a userId parameter from the router:
import React from 'react'
import { useSelector } from 'react-redux'
import { Link } from 'react-router-dom'

import { selectUserById } from '../users/usersSlice'
import { selectAllPosts } from '../posts/postsSlice'

export const UserPage = ({ match }) => {
  const { userId } = match.params

  const user = useSelector(state => selectUserById(state, userId))

  const postsForUser = useSelector(state => {
    const allPosts = selectAllPosts(state)
    return allPosts.filter(post => post.user === userId)
  })

  const postTitles = postsForUser.map(post => (
    <li key={post.id}>
      <Link to={`/posts/${post.id}`}>{post.title}</Link>
    </li>
  ))

  return (
    <section>
      <h2>{user.name}</h2>

      <ul>{postTitles}</ul>
    </section>
  )
}
As we've seen before, we can take data from one useSelector call, or from props, and use that to help decide what to read from the store in another useSelector call.
As usual, we will add routes for these components in <App>:
          <Route exact path="/posts/:postId" component={SinglePostPage} />
          <Route exact path="/editPost/:postId" component={EditPostForm} />
          <Route exact path="/users" component={UsersList} />
          <Route exact path="/users/:userId" component={UserPage} />
          <Redirect to="/" />
We'll also add another tab in <Navbar> that links to /users so that we can click and go to <UsersList>:
export const Navbar = () => {
  return (
    <nav>
      <section>
        <h1>Redux 핵심 Example</h1>

        <div className="navContent">
          <div className="navLinks">
            <Link to="/">Posts</Link>
            <Link to="/users">Users</Link>
          </div>
        </div>
      </section>
    </nav>
  )
}
Adding Notifications
No social media app would be complete without some notifications popping up to tell us that someone has sent a message, left a comment, or reacted to one of our posts.
In a real application, our app client would be in constant communication with the backend server, and the server would push an update to the client every time something happens. Since this is a small example app, we're going to mimic that process by adding a button to actually fetch some notification entries from our fake API. We also don't have any other real users sending messages or reacting to posts, so the fake API will just create some random notification entries every time we make a request. (Remember, the goal here is to see how to use Redux itself.)
Notifications Slice
Since this is a new part of our app, the first step is to create a new slice for our notifications, and an async thunk to fetch some notification entries from the API. In order to create some realistic notifications, we'll include the timestamp of the latest notification we have in state. That will let our mock server generate notifications newer than that timestamp.
import { createSlice, createAsyncThunk } from '@reduxjs/toolkit'

import { client } from '../../api/client'

export const fetchNotifications = createAsyncThunk(
  'notifications/fetchNotifications',
  async (_, { getState }) => {
    const allNotifications = selectAllNotifications(getState())
    const [latestNotification] = allNotifications
    const latestTimestamp = latestNotification ? latestNotification.date : ''
    const response = await client.get(
      `/fakeApi/notifications?since=${latestTimestamp}`
    )
    return response.data
  }
)

const notificationsSlice = createSlice({
  name: 'notifications',
  initialState: [],
  reducers: {},
  extraReducers(builder) {
    builder.addCase(fetchNotifications.fulfilled, (state, action) => {
      state.push(...action.payload)
      // Sort with newest first
      state.sort((a, b) => b.date.localeCompare(a.date))
    })
  }
})

export default notificationsSlice.reducer

export const selectAllNotifications = state => state.notifications
As with the other slices, import notificationsReducer into store.js and add it to the configureStore() call.
We've written an async thunk called fetchNotifications, which will retrieve a list of new notifications from the server. As part of that, we want to use the creation timestamp of the most recent notification as part of our request, so that the server knows it should only send back notifications that are actually new.
We know that we will be getting back an array of notifications, so we can pass them as separate arguments to state.push(), and the array will add each item. We also want to make sure that they're sorted so that the most recent notification is first in the array, just in case the server were to send them out of order. (As a reminder, array.sort() always mutates the existing array - this is only safe because we're using createSlice and Immer inside.)
Thunk Arguments
If you look at our fetchNotifications thunk, it has something new that we haven't seen before. Let's talk about thunk arguments for a minute.
We've already seen that we can pass an argument into a thunk action creator when we dispatch it, like dispatch(addPost(newPost)). For createAsyncThunk specifically, you can only pass in one argument, and whatever we pass in becomes the first argument of the payload creation callback.
The second argument to our payload creator is a thunkAPI object containing several useful functions and pieces of information:
dispatchandgetState: the actualdispatchandgetStatemethods from our Redux store. You can use these inside the thunk to dispatch more actions, or get the latest Redux store state (such as reading an updated value after another action is dispatched).extra: the "extra argument" that can be passed into the thunk middleware when creating the store. This is typically some kind of API wrapper, such as a set of functions that know how to make API calls to your application's server and return data, so that your thunks don't have to have all the URLs and query logic directly inside.requestId: a unique random ID value for this thunk call. Useful for tracking status of an individual request.signal: AnAbortController.signalfunction that can be used to cancel an in-progress request.rejectWithValue: a utility that helps customize the contents of arejectedaction if the thunk receives an error.
(If you're writing a thunk by hand instead of using createAsyncThunk, the thunk function will get(dispatch, getState) as separate arguments, instead of putting them together in one object.)
For more details on these arguments and how to handle canceling thunks and requests, see the createAsyncThunk API reference page.
In this case, we know that the list of notifications is in our Redux store state, and that the latest notification should be first in the array. We can destructure the getState function out of the thunkAPI object, call it to read the state value, and use the selectAllNotifications selector to give us just the array of notifications. Since the array of notifications is sorted newest first, we can grab the latest one using array destructuring.
Adding the Notifications List
With that slice created, we can add a <NotificationsList> component:
import React from 'react'
import { useSelector } from 'react-redux'
import { formatDistanceToNow, parseISO } from 'date-fns'

import { selectAllUsers } from '../users/usersSlice'

import { selectAllNotifications } from './notificationsSlice'

export const NotificationsList = () => {
  const notifications = useSelector(selectAllNotifications)
  const users = useSelector(selectAllUsers)

  const renderedNotifications = notifications.map(notification => {
    const date = parseISO(notification.date)
    const timeAgo = formatDistanceToNow(date)
    const user = users.find(user => user.id === notification.user) || {
      name: 'Unknown User'
    }

    return (
      <div key={notification.id} className="notification">
        <div>
          <b>{user.name}</b> {notification.message}
        </div>
        <div title={notification.date}>
          <i>{timeAgo} ago</i>
        </div>
      </div>
    )
  })

  return (
    <section className="notificationsList">
      <h2>Notifications</h2>
      {renderedNotifications}
    </section>
  )
}
Once again, we're reading a list of items from the Redux state, mapping over them, and rendering content for each item.
We also need to update the <Navbar> to add a "Notifications" tab, and a new button to fetch some notifications:
import React from 'react'
import { useDispatch } from 'react-redux'
import { Link } from 'react-router-dom'

import { fetchNotifications } from '../features/notifications/notificationsSlice'

export const Navbar = () => {
  const dispatch = useDispatch()

  const fetchNewNotifications = () => {
    dispatch(fetchNotifications())
  }

  return (
    <nav>
      <section>
        <h1>Redux 핵심 Example</h1>

        <div className="navContent">
          <div className="navLinks">
            <Link to="/">Posts</Link>
            <Link to="/users">Users</Link>
            <Link to="/notifications">Notifications</Link>
          </div>
          <button className="button" onClick={fetchNewNotifications}>
            Refresh Notifications
          </button>
        </div>
      </section>
    </nav>
  )
}
Lastly, we need to update App.js with the "Notifications" route so we can navigate to it:
// omit imports
import { NotificationsList } from './features/notifications/NotificationsList'

function App() {
  return (
    <Router>
      <Navbar />
      <div className="App">
        <Switch>
          <Route exact path="/notifications" component={NotificationsList} />
          // omit existing routes
          <Redirect to="/" />
        </Switch>
      </div>
    </Router>
  )
}
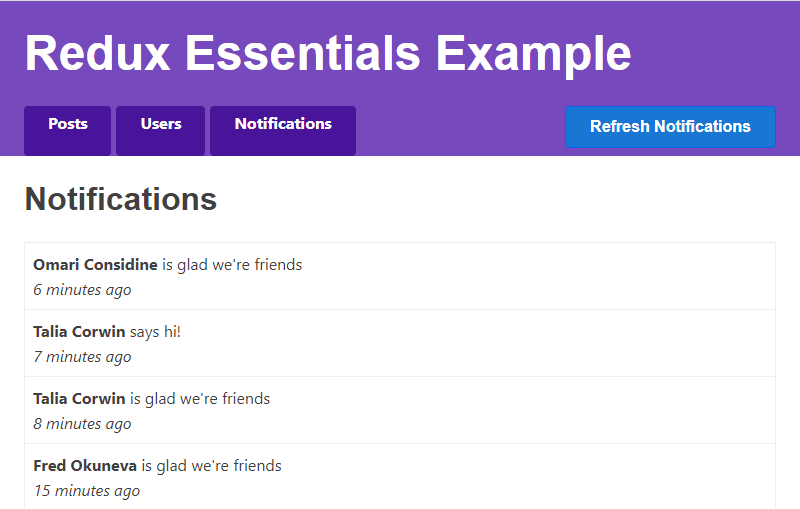
Here's what the "Notifications" tab looks like so far:
Showing New Notifications
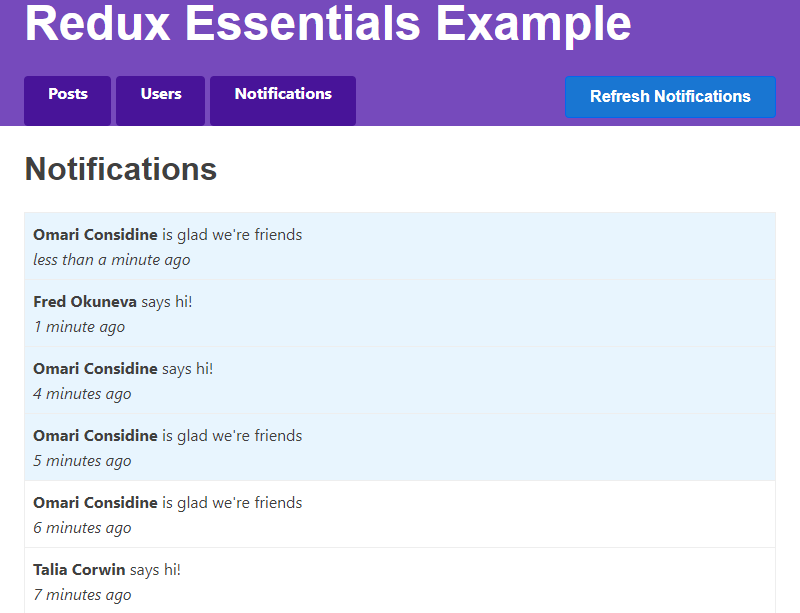
Each time we click "Refresh Notifications", a few more notification entries will be added to our list. In a real app, those could be coming from the server while we're looking at other parts of the UI. We can do something similar by clicking "Refresh Notifications" while we're looking at the <PostsList> or <UserPage>. But, right now we have no idea how many notifications just arrived, and if we keep clicking the button, there could be many notifications we haven't read yet. Let's add some logic to keep track of which notifications have been read and which of them are "new". That will let us show the count of "Unread" notifications as a badge on our "Notifications" tab in the navbar, and display new notifications in a different color.
Our fake API is already sending back the notification entries with isNew and read fields, so we can use those in our code.
First, we'll update notificationsSlice to have a reducer that marks all notifications as read, and some logic to handle marking existing notifications as "not new":
const notificationsSlice = createSlice({
  name: 'notifications',
  initialState: [],
  reducers: {
    allNotificationsRead(state, action) {
      state.forEach(notification => {
        notification.read = true
      })
    }
  },
  extraReducers(builder) {
    builder.addCase(fetchNotifications.fulfilled, (state, action) => {
      state.push(...action.payload)
      state.forEach(notification => {
        // Any notifications we've read are no longer new
        notification.isNew = !notification.read
      })
      // Sort with newest first
      state.sort((a, b) => b.date.localeCompare(a.date))
    })
  }
})

export const { allNotificationsRead } = notificationsSlice.actions

export default notificationsSlice.reducer
We want to mark these notifications as read whenever our <NotificationsList> component renders, either because we clicked on the tab to view the notifications, or because we already have it open and we just received some additional notifications. We can do this by dispatching allNotificationsRead any time this component re-renders. In order to avoid flashing of old data as this updates, we'll dispatch the action in a useLayoutEffect hook. We also want to add an additional classname to any notification list entries in the page, to highlight them:
import React, { useLayoutEffect } from 'react'
import { useSelector, useDispatch } from 'react-redux'
import { formatDistanceToNow, parseISO } from 'date-fns'
import classnames from 'classnames'

import { selectAllUsers } from '../users/usersSlice'

import {
  selectAllNotifications,
  allNotificationsRead
} from './notificationsSlice'

export const NotificationsList = () => {
  const dispatch = useDispatch()
  const notifications = useSelector(selectAllNotifications)
  const users = useSelector(selectAllUsers)

  useLayoutEffect(() => {
    dispatch(allNotificationsRead())
  })

  const renderedNotifications = notifications.map(notification => {
    const date = parseISO(notification.date)
    const timeAgo = formatDistanceToNow(date)
    const user = users.find(user => user.id === notification.user) || {
      name: 'Unknown User'
    }

    const notificationClassname = classnames('notification', {
      new: notification.isNew
    })

    return (
      <div key={notification.id} className={notificationClassname}>
        <div>
          <b>{user.name}</b> {notification.message}
        </div>
        <div title={notification.date}>
          <i>{timeAgo} ago</i>
        </div>
      </div>
    )
  })

  return (
    <section className="notificationsList">
      <h2>Notifications</h2>
      {renderedNotifications}
    </section>
  )
}
This works, but actually has a slightly surprising bit of behavior. Any time there are new notifications (either because we've just switched to this tab, or we've fetched some new notifications from the API), you'll actually see two "notifications/allNotificationsRead" actions dispatched. Why is that?
Let's say we have fetched some notifications while looking at the <PostsList>, and then click the "Notifications" tab. The <NotificationsList> component will mount, and the useLayoutEffect callback will run after that first render and dispatch allNotificationsRead. Our notificationsSlice will handle that by updating the notification entries in the store. This creates a new state.notifications array containing the immutably-updated entries, which forces our component to render again because it sees a new array returned from the useSelector, and the useLayoutEffect hook runs again and dispatches allNotificationsRead a second time. The reducer runs again, but this time no data changes, so the component doesn't re-render.
There's a couple ways we could potentially avoid that second dispatch, like splitting the logic to dispatch once when the component mounts, and only dispatch again if the size of the notifications array changes. But, this isn't actually hurting anything, so we can leave it alone.
This does actually show that it's possible to dispatch an action and not have any state changes happen at all. Remember, it's always up to your reducers to decide if any state actually needs to be updated, and "nothing needs to happen" is a valid decision for a reducer to make.
Here's how the notifications tab looks now that we've got the "new/read" behavior working:
The last thing we need to do before we move on is to add the badge on our "Notifications" tab in the navbar. This will show us the count of "Unread" notifications when we are in other tabs:
// omit imports
import { useDispatch, useSelector } from 'react-redux'

import {
  fetchNotifications,
  selectAllNotifications
} from '../features/notifications/notificationsSlice'

export const Navbar = () => {
  const dispatch = useDispatch()
  const notifications = useSelector(selectAllNotifications)
  const numUnreadNotifications = notifications.filter(n => !n.read).length
  // omit component contents
  let unreadNotificationsBadge

  if (numUnreadNotifications > 0) {
    unreadNotificationsBadge = (
      <span className="badge">{numUnreadNotifications}</span>
    )
  }
  return (
    <nav>
      // omit component contents
      <div className="navLinks">
        <Link to="/">Posts</Link>
        <Link to="/users">Users</Link>
        <Link to="/notifications">
          Notifications {unreadNotificationsBadge}
        </Link>
      </div>
      // omit component contents
    </nav>
  )
}
Improving Render Performance
Our application is looking useful, but we've actually got a couple flaws in when and how our components re-render. Let's look at those problems, and talk about some ways to improve the performance.
Investigating Render Behavior
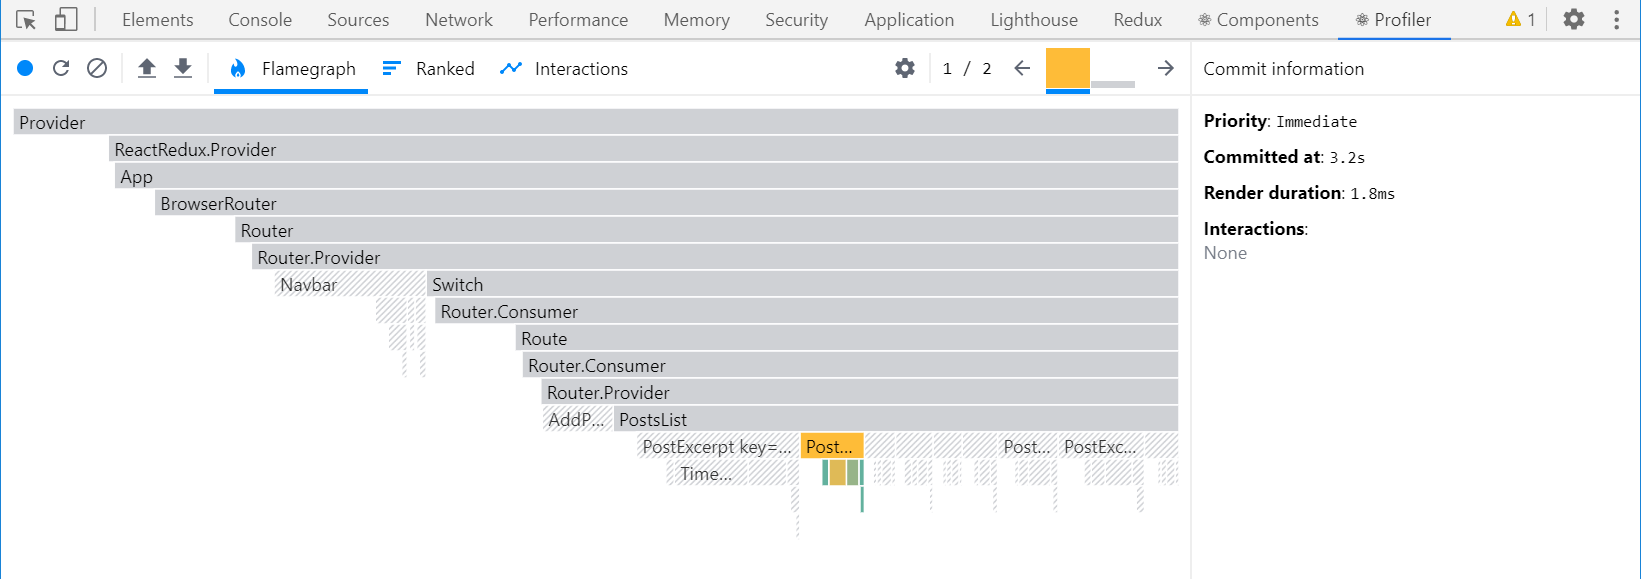
We can use the React DevTools Profiler to view some graphs of what components re-render when state is updated. Try clicking over to the <UserPage> for a single user. Open up your browser's DevTools, and in the React "Profiler" tab, click the circle "Record" button in the upper-left. Then, click the "Refresh Notifications" button in our app, and stop the recording in the React DevTools Profiler. You should see a chart that looks like this:
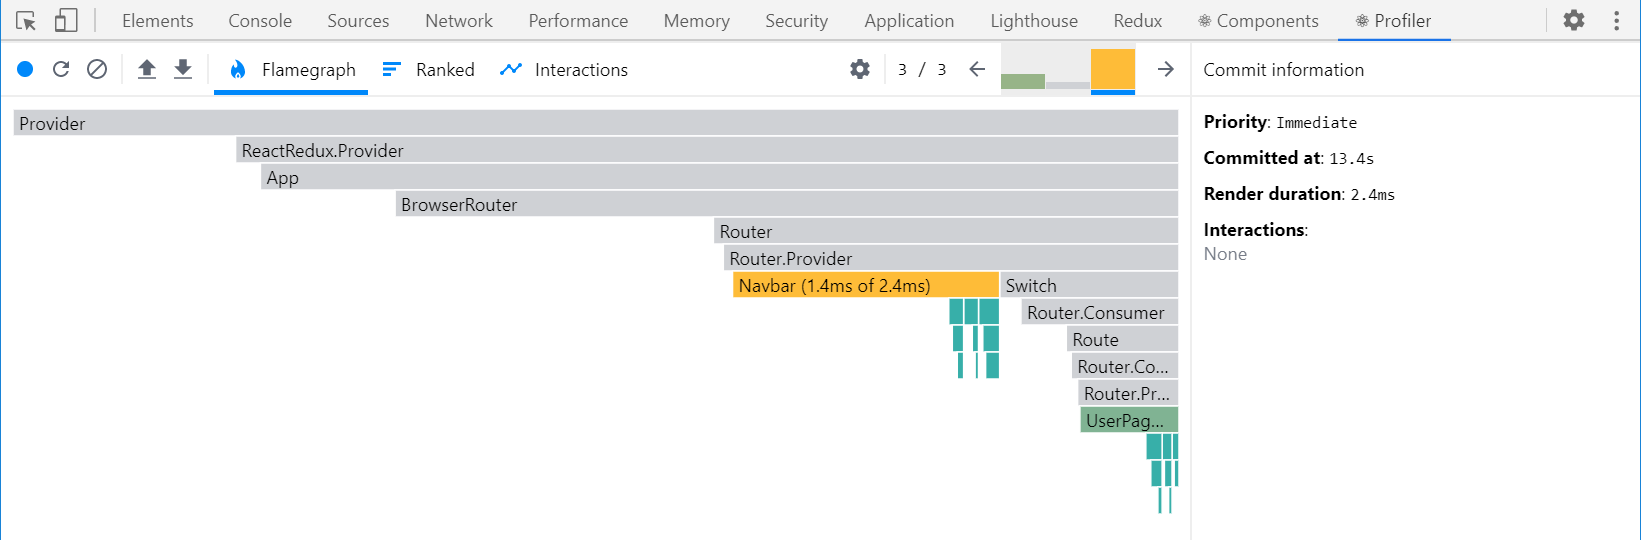
We can see that the <Navbar> re-rendered, which makes sense because it had to show the updated "unread notifications" badge in the tab. But, why did our <UserPage> re-render?
If we inspect the last couple dispatched actions in the Redux DevTools, we can see that only the notifications state updated. Since the <UserPage> doesn't read any notifications, it shouldn't have re-rendered. Something must be wrong with the component.
If we look at <UserPage> carefully, there's a specific problem:
export const UserPage = ({ match }) => {
  const { userId } = match.params

  const user = useSelector(state => selectUserById(state, userId))

  const postsForUser = useSelector(state => {
    const allPosts = selectAllPosts(state)
    return allPosts.filter(post => post.user === userId)
  })

  // omit rendering logic
}
We know that useSelector will re-run every time an action is dispatched, and that it forces the component to re-render if we return a new reference value.
We're calling filter() inside of our useSelector hook, so that we only return the list of posts that belong to this user. Unfortunately, this means that useSelector always returns a new array reference, and so our component will re-render after every action even if the posts data hasn't changed!.
Memoizing Selector Functions
What we really need is a way to only calculate the new filtered array if either state.posts or userId have changed. If they haven't changed, we want to return the same filtered array reference as the last time.
This idea is called "memoization". We want to save a previous set of inputs and the calculated result, and if the inputs are the same, return the previous result instead of recalculating it again.
So far, we've been writing selector functions by ourselves, and just so that we don't have to copy and paste the code for reading data from the store. It would be great if there was a way to make our selector functions memoized.
Reselect is a library for creating memoized selector functions, and was specifically designed to be used with Redux. It has a createSelector function that generates memoized selectors that will only recalculate results when the inputs change. Redux Toolkit exports the createSelector function, so we already have it available.
Let's make a new selectPostsByUser selector function, using Reselect, and use it here.
import { createSlice, createAsyncThunk, createSelector } from '@reduxjs/toolkit'

// omit slice logic

export const selectAllPosts = state => state.posts.posts

export const selectPostById = (state, postId) =>
  state.posts.posts.find(post => post.id === postId)

export const selectPostsByUser = createSelector(
  [selectAllPosts, (state, userId) => userId],
  (posts, userId) => posts.filter(post => post.user === userId)
)
createSelector takes one or more "input selector" functions as argument, plus an "output selector" function. When we call selectPostsByUser(state, userId), createSelector will pass all of the arguments into each of our input selectors. Whatever those input selectors return becomes the arguments for the output selector.
In this case, we know that we need the array of all posts and the user ID as the two arguments for our output selector. We can reuse our existing selectAllPosts selector to extract the posts array. Since the user ID is the second argument we're passing into selectPostsByUser, we can write a small selector that just returns userId.
Our output selector then takes posts and userId, and returns the filtered array of posts for just that user.
If we try calling selectPostsByUser multiple times, it will only re-run the output selector if either posts or userId has changed:
const state1 = getState()
// Output selector runs, because it's the first call
selectPostsByUser(state1, 'user1')
// Output selector does _not_ run, because the arguments haven't changed
selectPostsByUser(state1, 'user1')
// Output selector runs, because `userId` changed
selectPostsByUser(state1, 'user2')

dispatch(reactionAdded())
const state2 = getState()
// Output selector does not run, because `posts` and `userId` are the same
selectPostsByUser(state2, 'user2')

// Add some more posts
dispatch(addNewPost())
const state3 = getState()
// Output selector runs, because `posts` has changed
selectPostsByUser(state3, 'user2')
If we call this selector in <UserPage> and re-run the React profiler while fetching notifications, we should see that <UserPage> doesn't re-render this time:
export const UserPage = ({ match }) => {
  const { userId } = match.params

  const user = useSelector(state => selectUserById(state, userId))

  const postsForUser = useSelector(state => selectPostsByUser(state, userId))

  // omit rendering logic
}
Memoized selectors are a valuable tool for improving performance in a React+Redux application, because they can help us avoid unnecessary re-renders, and also avoid doing potentially complex or expensive calculations if the input data hasn't changed.
For more details on why we use selector functions and how to write memoized selectors with Reselect, see:
Investigating the Posts List
If we go back to our <PostsList> and try clicking a reaction button on one of the posts while capturing a React profiler trace, we'll see that not only did the <PostsList> and the updated <PostExcerpt> instance render, all of the <PostExcerpt> components rendered:
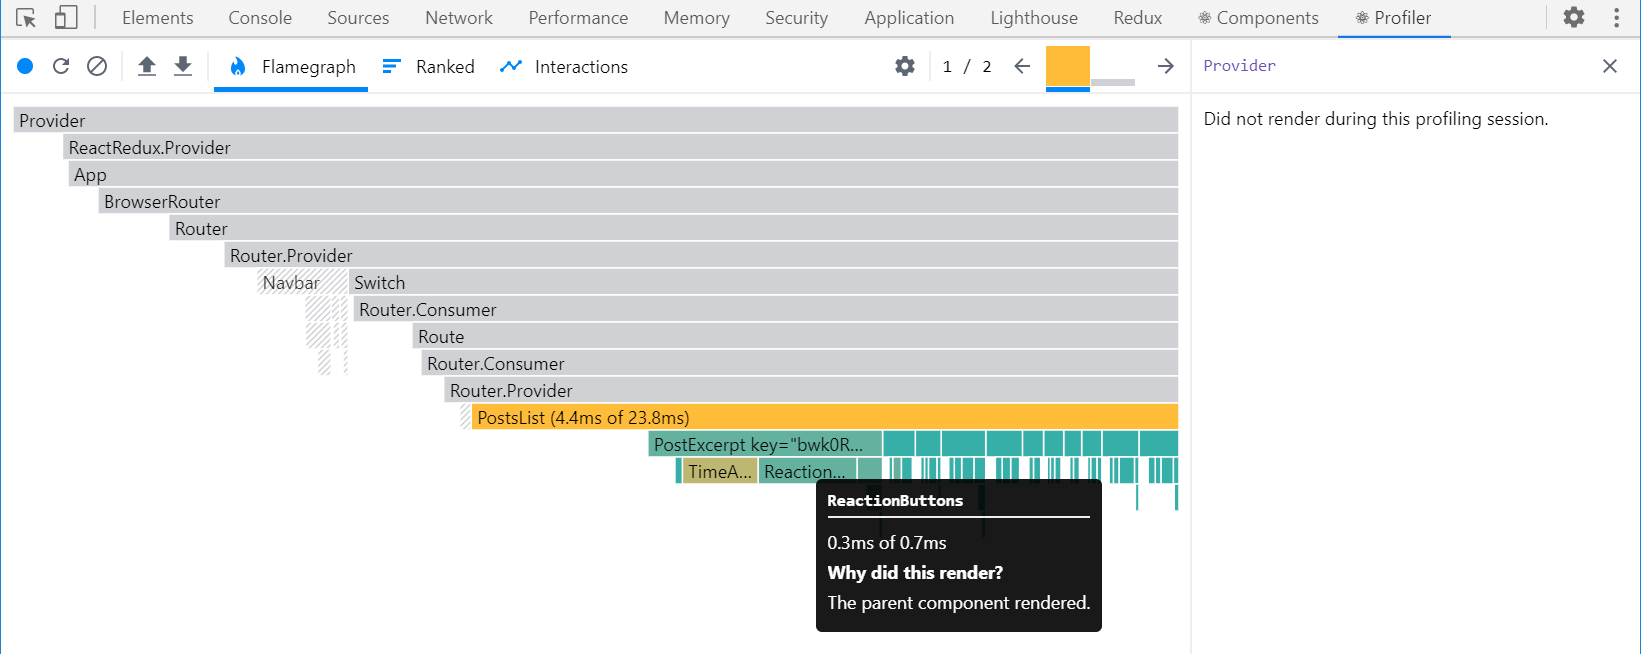
Why is that? None of the other posts changed, so why would they need to re-render?
React's default behavior is that when a parent component renders, React will recursively render all child components inside of it!. The immutable update of one post object also created a new posts array. Our <PostsList> had to re-render because the posts array was a new reference, so after it rendered, React continued downwards and re-rendered all of the <PostExcerpt> components too.
This isn't a serious problem for our small example app, but in a larger real-world app, we might have some very long lists or very large component trees, and having all those extra components re-render might slow things down.
There's a few different ways we could optimize this behavior in <PostsList>.
First, we could wrap the <PostExcerpt> component in React.memo(), which will ensure that the component inside of it only re-renders if the props have actually changed. This will actually work quite well - try it out and see what happens:
let PostExcerpt = ({ post }) => {
  // omit logic
}

PostExcerpt = React.memo(PostExcerpt)
Another option is to rewrite <PostsList> so that it only selects a list of post IDs from the store instead of the entire posts array, and rewrite <PostExcerpt> so that it receives a postId prop and calls useSelector to read the post object it needs. If <PostsList> gets the same list of IDs as before, it won't need to re-render, and so only our one changed <PostExcerpt> component should have to render.
Unfortunately, this gets tricky because we also need to have all our posts sorted by date and rendered in the right order. We could update our postsSlice to keep the array sorted at all times, so we don't have to sort it in the component, and use a memoized selector to extract just the list of post IDs. We could also customize the comparison function that useSelector runs to check the results, like useSelector(selectPostIds, shallowEqual), so that will skip re-rendering if the contents of the IDs array haven't changed.
The last option is to find some way to have our reducer keep a separate array of IDs for all the posts, and only modify that array when posts are added or removed, and do the same rewrite of <PostsList> and <PostExcerpt>. This way, <PostsList> only needs to re-render when that IDs array changes.
Conveniently, Redux Toolkit has a createEntityAdapter function that will help us do just that.
Normalizing Data
You've seen that a lot of our logic has been looking up items by their ID field. Since we've been storing our data in arrays, that means we have to loop over all the items in the array using array.find() until we find the item with the ID we're looking for.
Realistically, this doesn't take very long, but if we had arrays with hundreds or thousands of items inside, looking through the entire array to find one item becomes wasted effort. What we need is a way to look up a single item based on its ID, directly, without having to check all the other items. This process is known as "normalization".
Normalized State Structure
"Normalized state" means that:
- We only have one copy of each particular piece of data in our state, so there's no duplication
- Data that has been normalized is kept in a lookup table, where the item IDs are the keys, and the items themselves are the values.
- There may also be an array of all of the IDs for a particular item type
JavaScript objects can be used as lookup tables, similar to "maps" or "dictionaries" in other languages. Here's what the normalized state for a group of user objects might look like:
{
  users: {
    ids: ["user1", "user2", "user3"],
    entities: {
      "user1": {id: "user1", firstName, lastName},
      "user2": {id: "user2", firstName, lastName},
      "user3": {id: "user3", firstName, lastName},
    }
  }
}
This makes it easy to find a particular user object by its ID, without having to loop through all the other user objects in an array:
const userId = 'user2'
const userObject = state.users.entities[userId]
For more details on why normalizing state is useful, see Normalizing State Shape and the Redux Toolkit Usage Guide section on Managing Normalized Data.
Managing Normalized State with createEntityAdapter
Redux Toolkit's createEntityAdapter API provides a standardized way to store your data in a slice by taking a collection of items and putting them into the shape of { ids: [], entities: {} }. Along with this predefined state shape, it generates a set of reducer functions and selectors that know how to work with that data.
This has several benefits:
- We don't have to write the code to manage the normalization ourselves
createEntityAdapter's pre-built reducer functions handle common cases like "add all these items", "update one item", or "remove multiple items"createEntityAdaptercan keep the ID array in a sorted order based on the contents of the items, and will only update that array if items are added / removed or the sorting order changes.
createEntityAdapter accepts an options object that may include a sortComparer function, which will be used to keep the item IDs array in sorted order by comparing two items (and works the same way as Array.sort()).
It returns an object that contains a set of generated reducer functions for adding, updating, and removing items from an entity state object. These reducer functions can either be used as a case reducer for a specific action type, or as a "mutating" utility function within another reducer in createSlice.
The adapter object also has a getSelectors function. You can pass in a selector that returns this particular slice of state from the Redux root state, and it will generate selectors like selectAll and selectById.
Finally, the adapter object has a getInitialState function that generates an empty {ids: [], entities: {}} object. You can pass in more fields to getInitialState, and those will be merged in.
Updating the Posts Slice
With that in mind, let's update our postsSlice to use createEntityAdapter:
import {
  createEntityAdapter
  // omit other imports
} from '@reduxjs/toolkit'

const postsAdapter = createEntityAdapter({
  sortComparer: (a, b) => b.date.localeCompare(a.date)
})

const initialState = postsAdapter.getInitialState({
  status: 'idle',
  error: null
})

// omit thunks

const postsSlice = createSlice({
  name: 'posts',
  initialState,
  reducers: {
    reactionAdded(state, action) {
      const { postId, reaction } = action.payload
      const existingPost = state.entities[postId]
      if (existingPost) {
        existingPost.reactions[reaction]++
      }
    },
    postUpdated(state, action) {
      const { id, title, content } = action.payload
      const existingPost = state.entities[id]
      if (existingPost) {
        existingPost.title = title
        existingPost.content = content
      }
    }
  },
  extraReducers(builder) {
    // omit other reducers

    builder
      .addCase(fetchPosts.fulfilled, (state, action) => {
        state.status = 'succeeded'
        // Add any fetched posts to the array
        // Use the `upsertMany` reducer as a mutating update utility
        postsAdapter.upsertMany(state, action.payload)
      })
      // Use the `addOne` reducer for the fulfilled case
      .addCase(addNewPost.fulfilled, postsAdapter.addOne)
  }
})

export const { postAdded, postUpdated, reactionAdded } = postsSlice.actions

export default postsSlice.reducer

// Export the customized selectors for this adapter using `getSelectors`
export const {
  selectAll: selectAllPosts,
  selectById: selectPostById,
  selectIds: selectPostIds
  // Pass in a selector that returns the posts slice of state
} = postsAdapter.getSelectors(state => state.posts)

export const selectPostsByUser = createSelector(
  [selectAllPosts, (state, userId) => userId],
  (posts, userId) => posts.filter(post => post.user === userId)
)
There's a lot going on there! Let's break it down.
First, we import createEntityAdapter, and call it to create our postsAdapter object. We know that we want to keep an array of all post IDs sorted with the newest post first, so we pass in a sortComparer function that will sort newer items to the front based on the post.date field.
getInitialState() returns an empty {ids: [], entities: {}} normalized state object. Our postsSlice needs to keep the status and error fields for loading state too, so we pass those in to getInitialState().
Now that our posts are being kept as a lookup table in state.entities, we can change our reactionAdded and postUpdated reducers to directly look up the right posts by their IDs, instead of having to loop over the old posts array.
When we receive the fetchPosts.fulfilled action, we can use the postsAdapter.upsertMany function to add all of the incoming posts to the state, by passing in the draft state and the array of posts in action.payload. If there's any items in action.payload that already existing in our state, the upsertMany function will merge them together based on matching IDs.
When we receive the addNewPost.fulfilled action, we know we need to add that one new post object to our state. We can use the adapter functions as reducers directly, so we'll pass postsAdapter.addOne as the reducer function to handle that action.
Finally, we can replace the old hand-written selectAllPosts and selectPostById selector functions with the ones generated by postsAdapter.getSelectors. Since the selectors are called with the root Redux state object, they need to know where to find our posts data in the Redux state, so we pass in a small selector that returns state.posts. The generated selector functions are always called selectAll and selectById, so we can use ES6 destructuring syntax to rename them as we export them and match the old selector names. We'll also export selectPostIds the same way, since we want to read the list of sorted post IDs in our <PostsList> component.
Optimizing the Posts List
Now that our posts slice is using createEntityAdapter, we can update <PostsList> to optimize its rendering behavior.
We'll update <PostsList> to read just the sorted array of post IDs, and pass postId to each <PostExcerpt>:
// omit other imports

import {
  selectAllPosts,
  fetchPosts,
  selectPostIds,
  selectPostById
} from './postsSlice'

let PostExcerpt = ({ postId }) => {
  const post = useSelector(state => selectPostById(state, postId))
  // omit rendering logic
}

export const PostsList = () => {
  const dispatch = useDispatch()
  const orderedPostIds = useSelector(selectPostIds)

  // omit other selections and effects

  if (postStatus === 'loading') {
    content = <Spinner text="Loading..." />
  } else if (postStatus === 'succeeded') {
    content = orderedPostIds.map(postId => (
      <PostExcerpt key={postId} postId={postId} />
    ))
  } else if (postStatus === 'error') {
    content = <div>{error}</div>
  }

  // omit other rendering
}
Now, if we try clicking a reaction button on one of the posts while capturing a React component performance profile, we should see that only that one component re-rendered:
Converting Other Slices
We're almost done. As a final cleanup step, we'll update our other two slices to use createEntityAdapter as well.
Converting the Users Slice
The usersSlice is fairly small, so we've only got a few things to change:
import {
  createSlice,
  createAsyncThunk,
  createEntityAdapter
} from '@reduxjs/toolkit'
import { client } from '../../api/client'

const usersAdapter = createEntityAdapter()

const initialState = usersAdapter.getInitialState()

export const fetchUsers = createAsyncThunk('users/fetchUsers', async () => {
  const response = await client.get('/fakeApi/users')
  return response.users
})

const usersSlice = createSlice({
  name: 'users',
  initialState,
  reducers: {},
  extraReducers(builder) {
    builder.addCase(fetchUsers.fulfilled, usersAdapter.setAll)
  }
})

export default usersSlice.reducer

export const { selectAll: selectAllUsers, selectById: selectUserById } =
  usersAdapter.getSelectors(state => state.users)
The only action we're handling here always replaces the entire list of users with the array we fetched from the server. We can use usersAdapter.setAll to implement that instead.
Our <AddPostForm> is still trying to read state.users as an array, as is <PostAuthor>. Update them to use selectAllUsers and selectUserById, respectively.
Converting the Notifications Slice
Last but not least, we'll update notificationsSlice as well:
import {
  createSlice,
  createAsyncThunk,
  createEntityAdapter
} from '@reduxjs/toolkit'

import { client } from '../../api/client'

const notificationsAdapter = createEntityAdapter({
  sortComparer: (a, b) => b.date.localeCompare(a.date)
})

// omit fetchNotifications thunk

const notificationsSlice = createSlice({
  name: 'notifications',
  initialState: notificationsAdapter.getInitialState(),
  reducers: {
    allNotificationsRead(state, action) {
      Object.values(state.entities).forEach(notification => {
        notification.read = true
      })
    }
  },
  extraReducers(builder) {
    builder.addCase(fetchNotifications.fulfilled, (state, action) => {
      notificationsAdapter.upsertMany(state, action.payload)
      Object.values(state.entities).forEach(notification => {
        // Any notifications we've read are no longer new
        notification.isNew = !notification.read
      })
    })
  }
})

export const { allNotificationsRead } = notificationsSlice.actions

export default notificationsSlice.reducer

export const { selectAll: selectAllNotifications } =
  notificationsAdapter.getSelectors(state => state.notifications)
We again import createEntityAdapter, call it, and call notificationsAdapter.getInitialState() to help set up the slice.
Ironically, we do have a couple places in here where we need to loop over all notification objects and update them. Since those are no longer being kept in an array, we have to use Object.values(state.entities) to get an array of those notifications and loop over that. On the other hand, we can replace the previous fetch update logic with notificationsAdapter.upsertMany.
And with that... we're done learning the core concepts and functionality of Redux Toolkit!
What You've Learned
We've built a lot of new behavior in this section. Let's see what how the app looks with all those changes:
Here's what we covered in this section:
- Memoized selector functions can be used to optimize performance
- Redux Toolkit re-exports the
createSelectorfunction from Reselect, which generates memoized selectors - Memoized selectors will only recalculate the results if the input selectors return new values
- Memoization can skip expensive calculations, and ensure the same result references are returned
- Redux Toolkit re-exports the
- There are multiple patterns you can use to optimize React component rendering with Redux
- Avoid creating new object/array references inside of
useSelector- those will cause unnecessary re-renders - Memoized selector functions can be passed to
useSelectorto optimize rendering useSelectorcan accept an alternate comparison function likeshallowEqualinstead of reference equality- Components can be wrapped in
React.memo()to only re-render if their props change - List rendering can be optimized by having list parent components read just an array of item IDs, passing the IDs to list item children, and retrieving items by ID in the children
- Avoid creating new object/array references inside of
- Normalized state structure is a recommended approach for storing items
- "Normalization" means no duplication of data, and keeping items stored in a lookup table by item ID
- Normalized state shape usually looks like
{ids: [], entities: {}}
- Redux Toolkit's
createEntityAdapterAPI helps manage normalized data in a slice- Item IDs can be kept in sorted order by passing in a
sortCompareroption - The adapter object includes:
adapter.getInitialState, which can accept additional state fields like loading state- Prebuilt reducers for common cases, like
setAll,addMany,upsertOne, andremoveMany adapter.getSelectors, which generates selectors likeselectAllandselectById
- Item IDs can be kept in sorted order by passing in a
What's Next?
There's a couple more sections in the Redux 핵심 튜토리얼, but this is a good spot to pause and put what you've learned into practice.
The concepts we've covered in this tutorial so far should be enough to get you started building your own applications using React and Redux. Now's a great time to try working on a project yourself to solidify these concepts and see how they work in practice. If you're not sure what kind of a project to build, see this list of app project ideas for some inspiration.
Redux Toolkit also includes a powerful data fetching and caching API called "RTK Query". RTK Query is an optional addon that can completely eliminate the need to write any data fetching logic yourself. In Part 7: RTK Query Basics, you'll learn what RTK Query is, what problems it solves, and how to use it to fetch and use cached data in your application.
The Redux 핵심 튜토리얼 is focused on "how to use Redux correctly", rather than "how it works" or "why it works this way". In particular, Redux Toolkit is a higher-level set of abstractions and utilities, and it's helpful to understand what the abstractions in RTK are actually doing for you. Reading through the "Redux Fundamentals" tutorial will help you understand how to write Redux code "by hand", and why we recommend Redux Toolkit as the default way to write Redux logic.
The Using Redux section has information on a number of important concepts, like how to structure your reducers, and our Style Guide page has important information on our recommended patterns and best practices.
If you'd like to know more about why Redux exists, what problems it tries to solve, and how it's meant to be used, see Redux maintainer Mark Erikson's posts on The Tao of Redux, Part 1: Implementation and Intent and The Tao of Redux, Part 2: Practice and Philosophy.
If you're looking for help with Redux questions, come join the #redux channel in the Reactiflux server on Discord.
Thanks for reading through this tutorial, and we hope you enjoy building applications with Redux!