Redux Essentials, Part 7: RTK Query Basics
- How RTK Query simplifies data fetching for Redux apps
- How to set up RTK Query
- How to use RTK Query for basic data fetching and update requests
- Completion of the previous sections of this tutorial to understand Redux Toolkit usage patterns
Introduction
in Part 5: Async Logic and Data Fetching and Part 6: Performance and Normalization, we saw the standard patterns used for data fetching and caching with Redux. Those patterns include using async thunks to fetch data, dispatching actions with the results, managing request loading state in the store, and normalizing the cached data to enable easier lookups and updates of individual items by ID.
In this section, we'll look at how to use RTK Query, a data fetching and caching solution designed for Redux applications, and see how it simplifies the process of fetching data and using it in our components.
RTK Query Overview
RTK Query is a powerful data fetching and caching tool. It is designed to simplify common cases for loading data in a web application, eliminating the need to hand-write data fetching & caching logic yourself.
RTK Query is an optional addon included in the Redux Toolkit package, and its functionality is built on top of the other APIs in Redux Toolkit.
Motivation
Web applications normally need to fetch data from a server in order to display it. They also usually need to make updates to that data, send those updates to the server, and keep the cached data on the client in sync with the data on the server. This is made more complicated by the need to implement other behaviors used in today's applications:
- Tracking loading state in order to show UI spinners
- Avoiding duplicate requests for the same data
- Optimistic updates to make the UI feel faster
- Managing cache lifetimes as the user interacts with the UI
We've already seen how we can implement these behaviors using Redux Toolkit.
However, historically Redux has never included anything built in to help completely solve these use cases. Even when we use createAsyncThunk together with createSlice, there's still a fair amount of manual work involved in making requests and managing loading state. We have to create the async thunk, make the actual request, pull relevant fields out of the response, add loading state fields, add handlers in extraReducers to handle the pending/fulfilled/rejected cases, and actually write the proper state updates.
Over the last couple years, the React community has come to realize that "data fetching and caching" is really a different set of concerns than "state management". While you can use a state management library like Redux to cache data, the use cases are different enough that it's worth using tools that are purpose-built for the data fetching use case.
RTK Query takes inspiration from other tools that have pioneered solutions for data fetching, like Apollo Client, React Query, Urql, and SWR, but adds a unique approach to its API design:
- The data fetching and caching logic is built on top of Redux Toolkit's
createSliceandcreateAsyncThunkAPIs - Because Redux Toolkit is UI-agnostic, RTK Query's functionality can be used with any UI layer
- API endpoints are defined ahead of time, including how to generate query parameters from arguments and transform responses for caching
- RTK Query can also generate React hooks that encapsulate the entire data fetching process, provide
dataandisFetchingfields to components, and manage the lifetime of cached data as components mount and unmount - RTK Query provides "cache entry lifecycle" options that enable use cases like streaming cache updates via websocket messages after fetching the initial data
- We have early working examples of code generation of API slices from OpenAPI and GraphQL schemas
- Finally, RTK Query is completely written in TypeScript, and is designed to provide an excellent TS usage experience
What's included
APIs
RTK Query is included within the installation of the core Redux Toolkit package. It is available via either of the two entry points below:
import { createApi } from '@reduxjs/toolkit/query'

/* React-specific entry point that automatically generates
   hooks corresponding to the defined endpoints */
import { createApi } from '@reduxjs/toolkit/query/react'
RTK Query primarily consists of two APIs:
createApi(): The core of RTK Query's functionality. It allows you to define a set of endpoints describe how to retrieve data from a series of endpoints, including configuration of how to fetch and transform that data. In most cases, you should use this once per app, with "one API slice per base URL" as a rule of thumb.fetchBaseQuery(): A small wrapper aroundfetchthat aims to simplify requests. Intended as the recommendedbaseQueryto be used increateApifor the majority of users.
Bundle Size
RTK Query adds a fixed one-time amount to your app's bundle size. Since RTK Query builds on top of Redux Toolkit and React-Redux, the added size varies depending on whether you are already using those in your app. The estimated min+gzip bundle sizes are:
- If you are using RTK already: ~9kb for RTK Query and ~2kb for the hooks.
- If you are not using RTK already:
- Without React: 17 kB for RTK+dependencies+RTK Query
- With React: 19kB + React-Redux, which is a peer dependency
Adding additional endpoint definitions should only increase size based on the actual code inside the endpoints definitions, which will typically be just a few bytes.
The functionality included in RTK Query quickly pays for the added bundle size, and the elimination of hand-written data fetching logic should be a net improvement in size for most meaningful applications.
Thinking in RTK Query Caching
Redux has always had an emphasis on predictability and explicit behavior. There's no "magic" involved in Redux - you should be able to understand what's happening in the application because all Redux logic follows the same basic patterns of dispatching actions and updating state via reducers. This does mean that sometimes you have to write more code to make things happen, but the tradeoff is that should be very clear what the data flow and behavior is.
The Redux Toolkit core APIs do not change any of the basic data flow in a Redux app You're still dispatching actions and writing reducers, just with less code than writing all of that logic by hand. RTK Query is the same way. It's an additional level of abstraction, but internally it's still doing the exact same steps we've already seen for managing async requests and their responses.
However, when you use RTK Query, there is a mindset shift that happens. We're no longer thinking about "managing state" per se. Instead, we now think about "managing cached data". Rather than trying to write reducers ourselves, we're now going to focus on defining "where is this data coming from?", "how should this update be sent?", "when should this cached data be re-fetched?", and "how should the cached data be updated?". How that data gets fetched, stored, and retrieved becomes implementation details we no longer have to worry about.
We'll see how this mindset shift applies as we continue.
Setting Up RTK Query
Our example application already works, but now it's time to migrate all of the async logic over to use RTK Query. As we go through, we'll see how to use all the major features of RTK Query, as well as how to migrate existing uses of createAsyncThunk and createSlice over to use the RTK Query APIs.
Defining an API Slice
Previously, we've defined separate "slices" for each of our different data types like Posts, Users, and Notifications. Each slice had its own reducer, defined its own actions and thunks, and cached the entries for that data type separately.
With RTK Query, the logic for managing cached data is centralized into a single "API slice" per application. In much the same way that you have a single Redux store per app, we now have a single slice for all our cached data.
We'll start by defining a new apiSlice.js file. Since this isn't specific to any of the other "features" we've already written, we'll add a new features/api/ folder and put apiSlice.js in there. Let's fill out the API slice file, and then break down the code inside to see what it's doing:
// Import the RTK Query methods from the React-specific entry point
import { createApi, fetchBaseQuery } from '@reduxjs/toolkit/query/react'

// Define our single API slice object
export const apiSlice = createApi({
  // The cache reducer expects to be added at `state.api` (already default - this is optional)
  reducerPath: 'api',
  // All of our requests will have URLs starting with '/fakeApi'
  baseQuery: fetchBaseQuery({ baseUrl: '/fakeApi' }),
  // The "endpoints" represent operations and requests for this server
  endpoints: builder => ({
    // The `getPosts` endpoint is a "query" operation that returns data
    getPosts: builder.query({
      // The URL for the request is '/fakeApi/posts'
      query: () => '/posts'
    })
  })
})

// Export the auto-generated hook for the `getPosts` query endpoint
export const { useGetPostsQuery } = apiSlice
RTK Query's functionality is based on a single method, called createApi. All of the Redux Toolkit APIs we've seen so far are UI-agnostic, and could be used with any UI layer. The RTK Query core logic is the same way. However, RTK Query also includes a React-specific version of createApi, and since we're using RTK and React together, we need to use that to take advantage of RTK's React integration. So, we import from '@reduxjs/toolkit/query/react' specifically.
Your application is expected to have only one createApi call in it. This one API slice should contain all endpoint definitions that talk to the same base URL. For example, endpoints /api/posts and /api/users are both fetching data from the same server, so they would go in the same API slice. If your app does fetch data from multiple servers, you can either specify full URLs in each endpoint, or if necessary create separate API slices for each server.
Endpoints are normally defined directly inside the createApi call. If you're looking to split up your endpoints between multiple files, see the "Injecting Endpoints" section in Part 8 section of the docs!
API Slice Parameters
When we call createApi, there are two fields that are required:
baseQuery: a function that knows how to fetch data from the server. RTK Query includesfetchBaseQuery, a small wrapper around the standardfetch()function that handles typical processing of requests and responses. When we create afetchBaseQueryinstance, we can pass in the base URL of all future requests, as well as override behavior such as modifying request headers.endpoints: a set of operations that we've defined for interacting with this server. Endpoints can be queries, which return data for caching, or mutations, which send an update to the server. The endpoints are defined using a callback function that accepts abuilderparameter and returns an object containing endpoint definitions created withbuilder.query()andbuilder.mutation().
createApi also accepts a reducerPath field, which defines the expected top-level state slice field for the generated reducer. For our other slices like postsSlice, there's no guarantee that it will be used to update state.posts - we could have attached the reducer anywhere in the root state, like someOtherField: postsReducer. Here, createApi expects us to tell it where the cache state will exist when we add the cache reducer to the store. If you don't provide a reducerPath option, it defaults to 'api', so all your RTKQ cache data will be stored under state.api.
If you forget to add the reducer to the store, or attach it at a different key than what is specified in reducerPath, RTKQ will log an error to let you know this needs to be fixed.
Defining Endpoints
The first part of the URL for all requests is defined as '/fakeApi' in the fetchBaseQuery definition.
For our first step, we want to add an endpoint that will return the entire list of posts from the fake API server. We'll include an endpoint called getPosts, and define it as a query endpoint using builder.query(). This method accepts many options for configuring how to make the request and process the response. For now, all we need to do is supply the remaining piece of the URL path by defining a query option, with a callback that returns the URL string: () => '/posts'.
By default, query endpoints will use a GET HTTP request, but you can override that by returning an object like {url: '/posts', method: 'POST', body: newPost} instead of just the URL string itself. You can also define several other options for the request this way, such as setting headers.
Exporting API Slices and Hooks
In our earlier slice files, we just exported the action creators and the slice reducers, because those are all that's needed in other files. With RTK Query, we typically export the entire "API slice" object itself, because it has several fields that may be useful.
Finally, look carefully at the last line of this file. Where's this useGetPostsQuery value coming from?
RTK Query's React integration will automatically generate React hooks for every endpoint we define! Those hooks encapsulate the process of triggering a request when a component mounts, and re-rendering the component as the request is processed and data is available. We can export those hooks out of this API slice file for use in our React components.
The hooks are automatically named based on a standard convention:
use, the normal prefix for any React hook- The name of the endpoint, capitalized
- The type of the endpoint,
QueryorMutation
In this case, our endpoint is getPosts and it's a query endpoint, so the generated hook is useGetPostsQuery.
Configuring the Store
We now need to hook up the API slice to our Redux store. We can modify the existing store.js file to add the API slice's cache reducer to the state. Also, the API slice generates a custom middleware that needs to be added to the store. This middleware must be added as well - it manages cache lifetimes and expiration.
import postsReducer from '../features/posts/postsSlice'
import usersReducer from '../features/users/usersSlice'
import notificationsReducer from '../features/notifications/notificationsSlice'
import { apiSlice } from '../features/api/apiSlice'

export default configureStore({
  reducer: {
    posts: postsReducer,
    users: usersReducer,
    notifications: notificationsReducer,
    [apiSlice.reducerPath]: apiSlice.reducer
  },
  middleware: getDefaultMiddleware =>
    getDefaultMiddleware().concat(apiSlice.middleware)
})
We can reuse the apiSlice.reducerPath field as a computed key in the reducer parameter, to ensure that the caching reducer is added in the right place.
We need to keep all of the existing standard middleware like redux-thunk in the store setup, and the API slice's middleware typically goes after those. We can do that by supplying the middleware argument to configureStore, calling the provided getDefaultMiddleware() method, and adding apiSlice.middleware at the end of the returned middleware array.
Displaying Posts with Queries
Using Query Hooks in Components
Now that we have the API slice defined and added to the store, we can import the generated useGetPostsQuery hook into our <PostsList> component and use it there.
Currently, <PostsList> is specifically importing useSelector, useDispatch, and useEffect, reading posts data and loading state from the store, and dispatching the fetchPosts() thunk on mount to trigger the data fetch. The useGetPostsQueryHook replaces all of that!
Let's see how <PostsList> looks when we use this hook:
import React from 'react'
import { Link } from 'react-router-dom'

import { Spinner } from '../../components/Spinner'
import { PostAuthor } from './PostAuthor'
import { TimeAgo } from './TimeAgo'
import { ReactionButtons } from './ReactionButtons'

import { useGetPostsQuery } from '../api/apiSlice'

let PostExcerpt = ({ post }) => {
  return (
    <article className="post-excerpt" key={post.id}>
      <h3>{post.title}</h3>
      <div>
        <PostAuthor userId={post.user} />
        <TimeAgo timestamp={post.date} />
      </div>
      <p className="post-content">{post.content.substring(0, 100)}</p>

      <ReactionButtons post={post} />
      <Link to={`/posts/${post.id}`} className="button muted-button">
        View Post
      </Link>
    </article>
  )
}

export const PostsList = () => {
  const {
    data: posts,
    isLoading,
    isSuccess,
    isError,
    error
  } = useGetPostsQuery()

  let content

  if (isLoading) {
    content = <Spinner text="Loading..." />
  } else if (isSuccess) {
    content = posts.map(post => <PostExcerpt key={post.id} post={post} />)
  } else if (isError) {
    content = <div>{error.toString()}</div>
  }

  return (
    <section className="posts-list">
      <h2>Posts</h2>
      {content}
    </section>
  )
}
Conceptually, <PostsList> is still doing all the same work it was before, but we were able to replace the multiple useSelector calls and the useEffect dispatch with a single call to useGetPostsQuery().
Each generated query hook returns a "result" object containing several fields, including:
data: the actual response contents from the server. This field will beundefineduntil the response is received.isLoading: a boolean indicating if this hook is currently making the first request to the server. (Note that if the parameters change to request different data,isLoadingwill remain false.)isFetching: a boolean indicating if the hook is currently making any request to the serverisSuccess: a boolean indicating if the hook has made a successful request and has cached data available (ie,datashould be defined now)isError: a boolean indicating if the last request had an errorerror: a serialized error object
It's common to destructure fields from the result object, and possibly rename data to a more specific variable like posts to describe what it contains. We can then use the status booleans and the data/error fields to render the UI that we want. However, if you're using TypeScript, you may need to keep the original object as-is and refer to flags as result.isSuccess in your conditional checks, so that TS can correctly infer that data is valid.
Previously, we were selecting a list of post IDs from the store, passing a post ID to each <PostExcerpt> component, and selecting each individual Post object from the store separately. Since the posts array already has all of the post objects, we've switched back to passing the post objects themselves down as props.
Sorting Posts
Unfortunately, the posts are now being displayed out of order. Previously, we were sorting them by date at the reducer level with createEntityAdapter's sorting option. Since the API slice is just caching the exact array returned from the server, there's no specific sorting happening - whatever order the server sent back is what we've got.
There's a few different options for how to handle this. For now, we'll do the sorting inside of <PostsList> itself, and we'll talk about the other options and their tradeoffs later.
We can't just call posts.sort() directly, because Array.sort() mutates the existing array, so we'll need to make a copy of it first. To avoid re-sorting on every rerender, we can do the sorting in a useMemo() hook. We'll also want to give posts a default empty array in case it's undefined, so that we always have an array to sort on.
// omit setup

export const PostsList = () => {
  const {
    data: posts = [],
    isLoading,
    isSuccess,
    isError,
    error
  } = useGetPostsQuery()

  const sortedPosts = useMemo(() => {
    const sortedPosts = posts.slice()
    // Sort posts in descending chronological order
    sortedPosts.sort((a, b) => b.date.localeCompare(a.date))
    return sortedPosts
  }, [posts])

  let content

  if (isLoading) {
    content = <Spinner text="Loading..." />
  } else if (isSuccess) {
    content = sortedPosts.map(post => <PostExcerpt key={post.id} post={post} />)
  } else if (isError) {
    content = <div>{error.toString()}</div>
  }

  return (
    <section className="posts-list">
      <h2>Posts</h2>
      {content}
    </section>
  )
}
Displaying Individual Posts
We've updated <PostsList> to fetch a list of all posts, and we're showing pieces of each Post inside the list. But, if we click on "View Post" for any of them, our <SinglePostPage> component will fail to find a post in the old state.posts slice and show us a "Post not found!" error. We need to update <SinglePostPage> to use RTK Query as well.
There's a couple ways we could do this. One would be to have <SinglePostPage> call the same useGetPostsQuery() hook, get the entire array of posts, and find just the one Post object it needs to display. Query hooks also have a selectFromResult option that would allow us to do that same lookup earlier, inside the hook itself - we'll see this in action later.
Instead, we're going to try adding another endpoint definition that will let us request a single post from the server based on its ID. This is somewhat redundant, but it will allow us to see how RTK Query can be used to customize query requests based on arguments.
Adding the Single Post Query Endpoint
In apiSlice.js, we're going to add another query endpoint definition, called getPost (no 's' this time):
export const apiSlice = createApi({
  reducerPath: 'api',
  baseQuery: fetchBaseQuery({ baseUrl: '/fakeApi' }),
  endpoints: builder => ({
    getPosts: builder.query({
      query: () => '/posts'
    }),
    getPost: builder.query({
      query: postId => `/posts/${postId}`
    })
  })
})

export const { useGetPostsQuery, useGetPostQuery } = apiSlice
The getPost endpoint looks much like the existing getPosts endpoint, but the query parameter is different. Here, query takes an argument called postId, and we're using that postId to construct the server URL. That way we can make a server request for just one specific Post object.
This also generates a new useGetPostQuery hook, so we export that as well.
Query Arguments and Cache Keys
Our <SinglePostPage> is currently reading one Post entry from state.posts based on ID. We need to update it to call the new useGetPostQuery hook, and use similar loading state as the main list.
import React from 'react'
import { Link } from 'react-router-dom'

import { Spinner } from '../../components/Spinner'
import { useGetPostQuery } from '../api/apiSlice'

import { PostAuthor } from './PostAuthor'
import { TimeAgo } from './TimeAgo'
import { ReactionButtons } from './ReactionButtons'

export const SinglePostPage = ({ match }) => {
  const { postId } = match.params

  const { data: post, isFetching, isSuccess } = useGetPostQuery(postId)

  let content
  if (isFetching) {
    content = <Spinner text="Loading..." />
  } else if (isSuccess) {
    content = (
      <article className="post">
        <h2>{post.title}</h2>
        <div>
          <PostAuthor userId={post.user} />
          <TimeAgo timestamp={post.date} />
        </div>
        <p className="post-content">{post.content}</p>
        <ReactionButtons post={post} />
        <Link to={`/editPost/${post.id}`} className="button">
          Edit Post
        </Link>
      </article>
    )
  }

  return <section>{content}</section>
}
Notice that we're taking the postId we've read from the router match, and passing it as an argument to useGetPostQuery. The query hook will then use that to construct the request URL, and fetch this specific Post object.
So how is all this data being cached, anyway? Let's click "View Post" for one of our post entries, then take a look at what's inside the Redux store at this point.
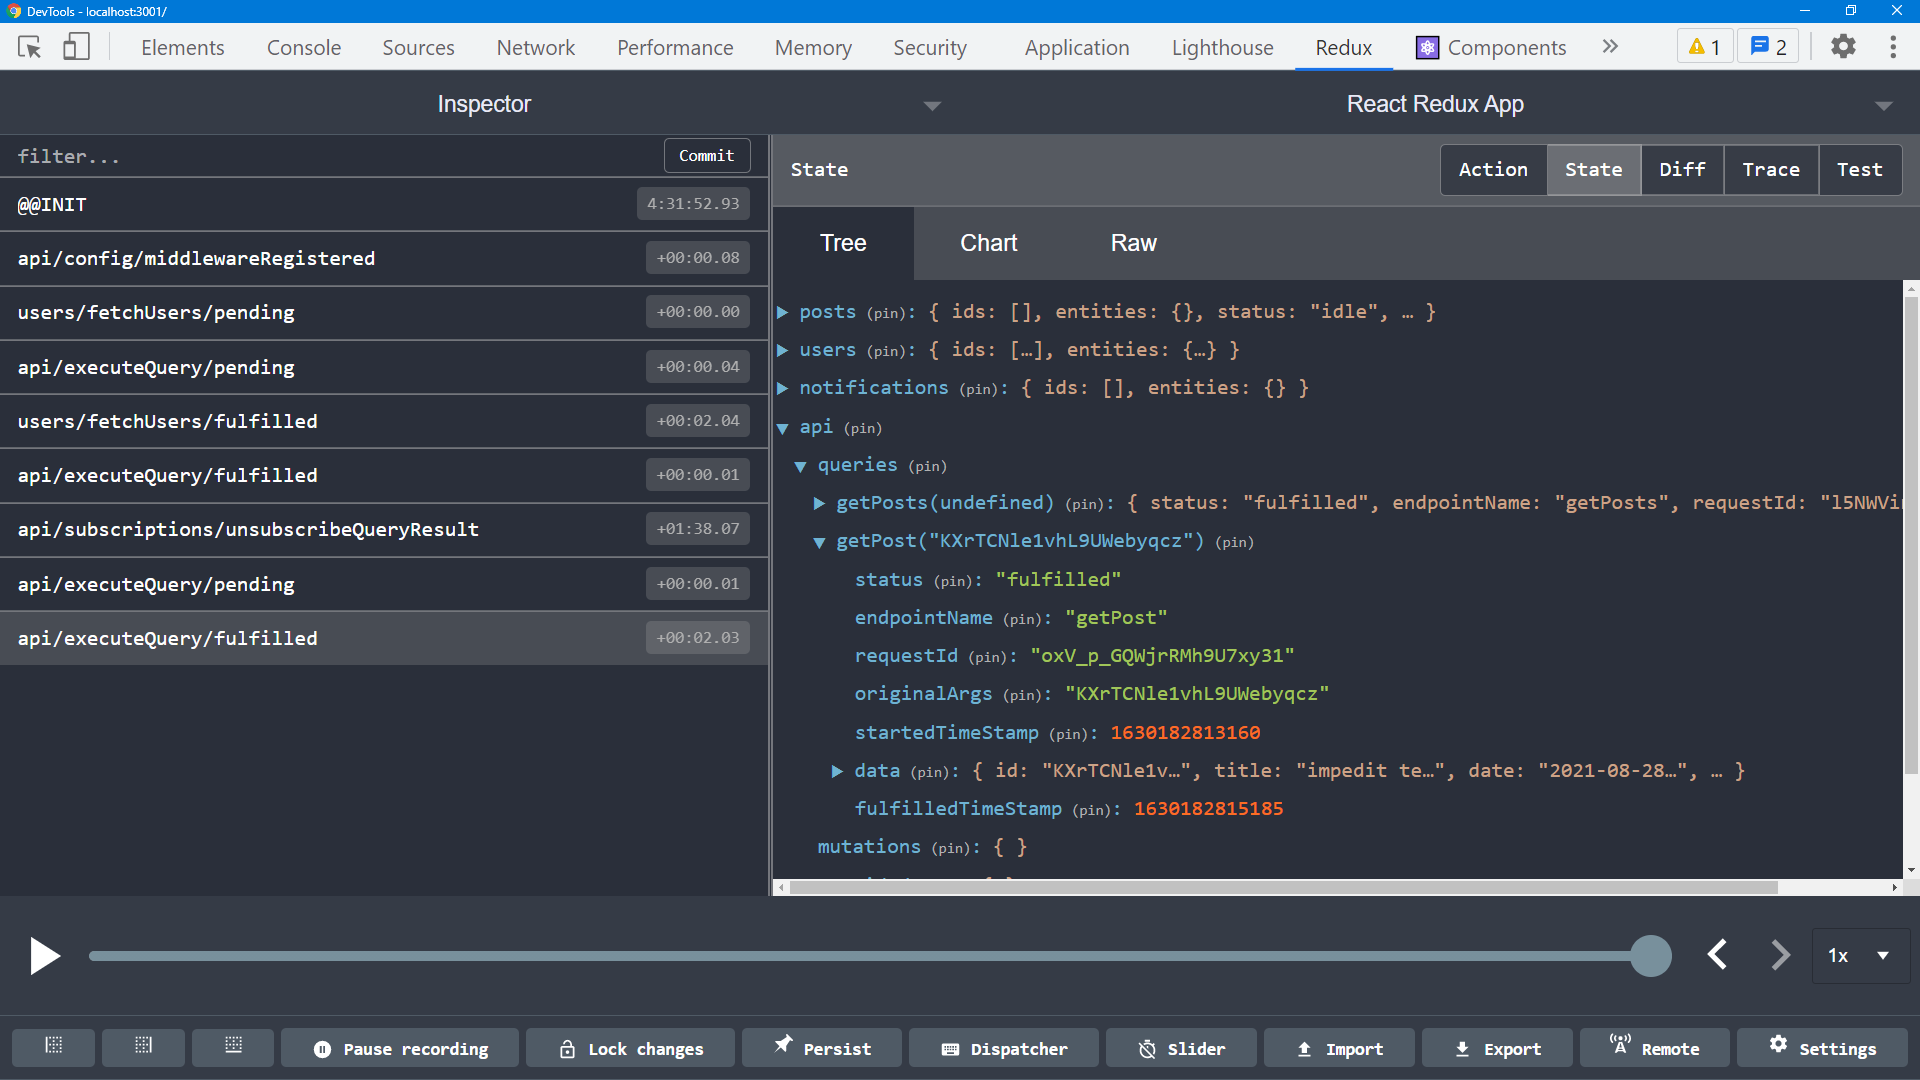
We can see that we have a top-level state.api slice, as expected from the store setup. Inside of there is a section called queries, and it currently has two items. The key getPosts(undefined) represents the metadata and response contents for the request we made with the getPosts endpoint. Similarly, the key getPost('abcd1234') is for the specific request we just made for this one post.
RTK Query creates a "cache key" for each unique endpoint + argument combination, and stores the results for each cache key separately. That means that you can use the same query hook multiple times, pass it different query parameters, and each result will be cached separately in the Redux store.
It's also important to note that the query parameter must be a single value! If you need to pass through multiple parameters, you must pass an object containing multiple fields (exactly the same as with createAsyncThunk). RTK Query will do a "shallow stable" comparison of the fields, and re-fetch the data if any of them have changed.
Notice that the names of the actions in the left-hand list are much more generic and less descriptive: api/executeQuery/fulfilled, instead of posts/fetchPosts/fulfilled. This is a tradeoff of using an additional abstraction layer. The individual actions do contain the specific endpoint name under action.meta.arg.endpointName, but it's not as easily viewable in the action history list.
The Redux team is working on a new RTK Query view for the Redux DevTools that will specifically show RTK Query data in a more usable format. This includes info on each endpoint and cache result, stats on query timing, and much more. This will be added to the DevTools Extension in the near future. For a preview, see:
Creating Posts with Mutations
We've seen how we can fetch data from the server by defining "query" endpoints, but what about sending updates to the server?
RTK Query lets us define mutation endpoints that update data on the server. Let's add a mutation that will let us add a new post.
Adding the New Post Mutation Endpoint
Adding a mutation endpoint is very similar to adding a query endpoint. The biggest difference is that we define the endpoint using builder.mutation() instead of builder.query(). Also, we now need to change the HTTP method to be a 'POST' request, and we have to provide the body of the request as well.
export const apiSlice = createApi({
  reducerPath: 'api',
  baseQuery: fetchBaseQuery({ baseUrl: '/fakeApi' }),
  endpoints: builder => ({
    getPosts: builder.query({
      query: () => '/posts'
    }),
    getPost: builder.query({
      query: postId => `/posts/${postId}`
    }),
    addNewPost: builder.mutation({
      query: initialPost => ({
        url: '/posts',
        method: 'POST',
        // Include the entire post object as the body of the request
        body: initialPost
      })
    })
  })
})

export const {
  useGetPostsQuery,
  useGetPostQuery,
  useAddNewPostMutation
} = apiSlice
Here our query option returns an object containing {url, method, body}. Since we're using fetchBaseQuery to make the requests, the body field will automatically be JSON-serialized for us.
Like with query endpoints, the API slice automatically generates a React hook for the mutation endpoint - in this case, useAddNewPostMutation.
Using Mutation Hooks in Components
Our <AddPostForm> is already dispatching an async thunk to add a post whenever we click the "Save Post" button. To do that, it has to import useDispatch and the addNewPost thunk. The mutation hooks replace both of those, and the usage pattern is very similar.
import React, { useState } from 'react'
import { useSelector } from 'react-redux'

import { Spinner } from '../../components/Spinner'
import { useAddNewPostMutation } from '../api/apiSlice'
import { selectAllUsers } from '../users/usersSlice'

export const AddPostForm = () => {
  const [title, setTitle] = useState('')
  const [content, setContent] = useState('')
  const [userId, setUserId] = useState('')

  const [addNewPost, { isLoading }] = useAddNewPostMutation()
  const users = useSelector(selectAllUsers)

  const onTitleChanged = e => setTitle(e.target.value)
  const onContentChanged = e => setContent(e.target.value)
  const onAuthorChanged = e => setUserId(e.target.value)

  const canSave = [title, content, userId].every(Boolean) && !isLoading

  const onSavePostClicked = async () => {
    if (canSave) {
      try {
        await addNewPost({ title, content, user: userId }).unwrap()
        setTitle('')
        setContent('')
        setUserId('')
      } catch (err) {
        console.error('Failed to save the post: ', err)
      }
    }
  }

  // omit rendering logic
}
Mutation hooks return an array with two values:
- The first value is a "trigger function". When called, it makes the request to the server, with whatever argument you provide. This is effectively like a thunk that has already been wrapped to immediately dispatch itself.
- The second value is an object with metadata about the current in-progress request, if any. This includes an
isLoadingflag to indicate if a request is in-progress.
We can replace the existing thunk dispatch and component loading state with the trigger function and isLoading flag from the useAddNewPostMutation hook, and the rest of the component stays the same.
As with the thunk dispatch, we call addNewPost with the initial post object. This returns a special Promise with a .unwrap() method, and we can await addNewPost().unwrap() to handle any potential errors with a standard try/catch block.
Refreshing Cached Data
When we click "Save Post", we can view the Network tab in the browser DevTools and confirm that the HTTP POST request succeeded. But, the new post isn't showing up in our <PostsList> if we go back there. We still have the same cached data in memory.
We need to tell RTK Query to refresh its cached list of posts so that we can see the new post we just added.
Refetching Posts Manually
The first option is to manually force RTK Query to refetch data for a given endpoint. Query hook result objects include a refetch function that we can call to force a refetch. We can temporarily add a "Refetch Posts" button to <PostsList> and click that after adding a new post.
Also, earlier we saw that query hooks have both an isLoading flag, which is true if this is the first request for data, and an isFetching flag, which is true while any request for data is in progress. We could look at the isFetching flag, and replace the entire list of posts with a loading spinner again while the refetch is in progress. But, that could be a bit annoying, and besides - we already have all these posts, why should we completely hide them?
Instead, we could make the existing list of posts partially transparent to indicate the data is stale, but keep them visible while the refetch is happening. As soon as the request completes, we can return to showing the posts list as normal.
import React, { useMemo } from 'react'
import { Link } from 'react-router-dom'
import classnames from 'classnames'

// omit other imports and PostExcerpt

export const PostsList = () => {
  const {
    data: posts = [],
    isLoading,
    isFetching,
    isSuccess,
    isError,
    error,
    refetch
  } = useGetPostsQuery()

  const sortedPosts = useMemo(() => {
    const sortedPosts = posts.slice()
    sortedPosts.sort((a, b) => b.date.localeCompare(a.date))
    return sortedPosts
  }, [posts])

  let content

  if (isLoading) {
    content = <Spinner text="Loading..." />
  } else if (isSuccess) {
    const renderedPosts = sortedPosts.map(post => (
      <PostExcerpt key={post.id} post={post} />
    ))

    const containerClassname = classnames('posts-container', {
      disabled: isFetching
    })

    content = <div className={containerClassname}>{renderedPosts}</div>
  } else if (isError) {
    content = <div>{error.toString()}</div>
  }

  return (
    <section className="posts-list">
      <h2>Posts</h2>
      <button onClick={refetch}>Refetch Posts</button>
      {content}
    </section>
  )
}
If we add a new post and then click "Refetch Posts", we should now see the posts list go semi-transparent for a couple seconds, then re-render with the new post added at the top.
Automatic Refreshing with Cache Invalidation
Having users manually click to refetch data is occasionally necessary, but definitely not a good solution for normal usage.
We know that our "server" has a complete list of all posts, including the one we just added. Ideally, we want to have our app automatically refetch the updated list of posts as soon as the mutation request has completed. That way we know our client-side cached data is in sync with what the server has.
RTK Query lets us define relationships between queries and mutations to enable automatic data refetching, using "tags". A "tag" is a string or small object that lets you name certain types of data, and invalidate portions of the cache. When a cache tag is invalidated, RTK Query will automatically refetch the endpoints that were marked with that tag.
Basic tag usage requires adding three pieces of information to our API slice:
- A root
tagTypesfield in the API slice object, declaring an array of string tag names for data types such as'Post' - A
providesTagsarray in query endpoints, listing a set of tags describing the data in that query - An
invalidatesTagsarray in mutation endpoints, listing a set of tags that are invalidated every time that mutation runs
We can add a single tag called 'Post' to our API slice that will let us automatically refetch our getPosts endpoint any time we add a new post:
export const apiSlice = createApi({
  reducerPath: 'api',
  baseQuery: fetchBaseQuery({ baseUrl: '/fakeApi' }),
  tagTypes: ['Post'],
  endpoints: builder => ({
    getPosts: builder.query({
      query: () => '/posts',
      providesTags: ['Post']
    }),
    getPost: builder.query({
      query: postId => `/posts/${postId}`
    }),
    addNewPost: builder.mutation({
      query: initialPost => ({
        url: '/posts',
        method: 'POST',
        body: initialPost
      }),
      invalidatesTags: ['Post']
    })
  })
})
That's all we need! Now, if we click "Save Post", you should see the <PostsList> component automatically gray out after a couple seconds, and then rerender with the newly added post at the top.
Note that there's nothing special about the literal string 'Post' here. We could have called it 'Fred', 'qwerty', or anything else. It just needs to be the same string in each field, so that RTK Query knows "when this mutation happens, invalidate all endpoints that have that same tag string listed".
What You've Learned
With RTK Query, the actual details of how to manage data fetching, caching, and loading state are abstracted away. This simplifies application code considerably, and lets us focus on higher-level concerns about intended app behavior instead. Since RTK Query is implemented using the same Redux Toolkit APIs we've already seen, we can still use the Redux DevTools to view the changes in our state over time.
- RTK Query is a data fetching and caching solution included in Redux Toolkit
- RTK Query abstracts the process of managing cached server data for you, and eliminates the need to write logic for loading state, storing results, and making requests
- RTK Query builds on top of the same patterns used in Redux, like async thunks
- RTK Query uses a single "API slice" per application, defined using
createApi- RTK Query provides UI-agnostic and React-specific versions of
createApi - API slices define multiple "endpoints" for different server operations
- The API slice includes auto-generated React hooks if using the React integration
- RTK Query provides UI-agnostic and React-specific versions of
- Query endpoints allow fetching and caching data from the server
- Query hooks return a
datavalue, plus loading status flags - The query can be re-fetched manually, or automatically using "tags" for cache invalidation
- Query hooks return a
- Mutation endpoints allow updating data on the server
- Mutation hooks return a "trigger" function that sends an update request, plus loading status
- The trigger function returns a Promise that can be "unwrapped" and awaited
What's Next?
RTK Query provides solid default behavior, but also includes many options for customizing how requests are managed and working with cached data. In Part 8: RTK Query Advanced Patterns, we'll see how to use these options to implement useful features like optimistic updates.