Redux Essentials, Part 8: RTK Query Advanced Patterns
- How to use tags with IDs to manage cache invalidation and refetching
- How to work with the RTK Query cache outside of React
- Techniques for manipulating response data
- Implementing optimistic updates and streaming updates
- Completion of Part 7 to understand RTK Query setup and basic usage
Introduction
In Part 7: RTK Query Basics, we saw how to set up and use the RTK Query API to handle data fetching and caching in our application. We added an "API slice" to our Redux store, defined "query" endpoints to fetch posts data, and a "mutation" endpoint to add a new post.
In this section, we'll continue migrating our example app to use RTK Query for the other data types, and see how to use some of its advanced features to simplify the codebase and improve user experience.
Some of the changes in this section aren't strictly necessary - they're included to demonstrate RTK Query's features and show some of the things you can do, so you can see how to use these features if you need them.
Editing Posts
We've already added a mutation endpoint to save new Post entries to the server, and used that in our <AddPostForm>. Next, we need to handle updating the <EditPostForm> to let us edit an existing post.
Updating the Edit Post Form
As with adding posts, the first step is to define a new mutation endpoint in our API slice. This will look much like the mutation for adding a post, but the endpoint needs to include the post ID in the URL and use an HTTP PATCH request to indicate that it's updating some of the fields.
export const apiSlice = createApi({
  reducerPath: 'api',
  baseQuery: fetchBaseQuery({ baseUrl: '/fakeApi' }),
  tagTypes: ['Post'],
  endpoints: builder => ({
    getPosts: builder.query({
      query: () => '/posts',
      providesTags: ['Post']
    }),
    getPost: builder.query({
      query: postId => `/posts/${postId}`
    }),
    addNewPost: builder.mutation({
      query: initialPost => ({
        url: '/posts',
        method: 'POST',
        body: initialPost
      }),
      invalidatesTags: ['Post']
    }),
    editPost: builder.mutation({
      query: post => ({
        url: `/posts/${post.id}`,
        method: 'PATCH',
        body: post
      })
    })
  })
})

export const {
  useGetPostsQuery,
  useGetPostQuery,
  useAddNewPostMutation,
  useEditPostMutation
} = apiSlice
Once that's added, we can update the <EditPostForm>. It needs to read the original Post entry from the store, use that to initialize the component state to edit the fields, and then send the updated changes to the server. Currently, we're reading the Post entry with selectPostById, and manually dispatching a postUpdated thunk for the request.
We can use the same useGetPostQuery hook that we used in <SinglePostPage> to read the Post entry from the cache in the store, and we'll use the new useEditPostMutation hook to handle saving the changes.
import React, { useState } from 'react'
import { useHistory } from 'react-router-dom'

import { Spinner } from '../../components/Spinner'
import { useGetPostQuery, useEditPostMutation } from '../api/apiSlice'

export const EditPostForm = ({ match }) => {
  const { postId } = match.params

  const { data: post } = useGetPostQuery(postId)
  const [updatePost, { isLoading }] = useEditPostMutation()

  const [title, setTitle] = useState(post.title)
  const [content, setContent] = useState(post.content)

  const history = useHistory()

  const onTitleChanged = e => setTitle(e.target.value)
  const onContentChanged = e => setContent(e.target.value)

  const onSavePostClicked = async () => {
    if (title && content) {
      await updatePost({ id: postId, title, content })
      history.push(`/posts/${postId}`)
    }
  }

  // omit rendering logic
}
Cache Data Subscription Lifetimes
Let's try this out and see what happens. Open up your browser's DevTools, go to the Network tab, and refresh the main page. You should see a GET request to /posts as we fetch the initial data. When you click on a "View Post" button, you should see a second request to /posts/:postId that returns that single post entry.
Now click "Edit Post" inside the single post page. The UI switches over to show <EditPostForm>, but this time there's no network request for the individual post. Why not?

RTK Query allows multiple components to subscribe to the same data, and will ensure that each unique set of data is only fetched once. Internally, RTK Query keeps a reference counter of active "subscriptions" to each endpoint + cache key combination. If Component A calls useGetPostQuery(42), that data will be fetched. If Component B then mounts and also calls useGetPostQuery(42), it's the exact same data being requested. The two hook usages will return the exact same results, including fetched data and loading status flags.
When the number of active subscriptions goes down to 0, RTK Query starts an internal timer. If the timer expires before any new subscriptions for the data are added, RTK Query will remove that data from the cache automatically, because the app no longer needs the data. However, if a new subscription is added before the timer expires, the timer is canceled, and the already-cached data is used without needing to refetch it.
In this case, our <SinglePostPage> mounted and requested that individual Post by ID. When we clicked on "Edit Post", the <SinglePostPage> component was unmounted by the router, and the active subscription was removed due to unmounting. RTK Query immediately started a "remove this post data" timer. But, the <EditPostPage> component mounted right away and subscribed to the same Post data with the same cache key. So, RTK Query canceled the timer and kept using the same cached data instead of fetching it from the server.
By default, unused data is removed from the cache after 60 seconds, but this can be configured in either the root API slice definition or overridden in the individual endpoint definitions using the keepUnusedDataFor flag, which specifies a cache lifetime in seconds.
Invalidating Specific Items
Our <EditPostForm> component can now save the edited post to the server, but we have a problem. If we click "Save Post" while editing, it returns us to the <SinglePostPage>, but it's still showing the old data without the edits. The <SinglePostPage> is still using the cached Post entry that was fetched earlier. For that matter, if we return to the main page and look at the <PostsList>, it's also showing the old data. We need a way to force a refetch of both the individual Post entry, and the entire list of posts.
Earlier, we saw how we can use "tags" to invalidate parts of our cached data. We declared that the getPosts query endpoint provides a 'Post' tag, and that the addNewPost mutation endpoint invalidates that same 'Post' tag. That way, every time we add a new post, we force RTK Query to refetch the entire list of posts from the getQuery endpoint.
We could add a 'Post' tag to both the getPost query and the editPost mutation, but that would force all the other individual posts to be refetched as well. Fortunately, RTK Query lets us define specific tags, which let us be more selective in invalidating data. These specific tags look like {type: 'Post', id: 123}.
Our getPosts query defines a providesTags field that is an array of strings. The providesTags field can also accept a callback function that receives the result and arg, and returns an array. This allows us to create tag entries based on IDs of data that is being fetched. Similarly, invalidatesTags can be a callback as well.
In order to get the right behavior, we need to set up each endpoint with the right tags:
getPosts: provides a general'Post'tag for the whole list, as well as a specific{type: 'Post', id}tag for each received post objectgetPost: provides a specific{type: 'Post', id}object for the individual post objectaddNewPost: invalidates the general'Post'tag, to refetch the whole listeditPost: invalidates the specific{type: 'Post', id}tag. This will force a refetch of both the individual post fromgetPost, as well as the entire list of posts fromgetPosts, because they both provide a tag that matches that{type, id}value.
export const apiSlice = createApi({
  reducerPath: 'api',
  baseQuery: fetchBaseQuery({ baseUrl: '/fakeApi' }),
  tagTypes: ['Post'],
  endpoints: builder => ({
    getPosts: builder.query({
      query: () => '/posts',
      providesTags: (result = [], error, arg) => [
        'Post',
        ...result.map(({ id }) => ({ type: 'Post', id }))
      ]
    }),
    getPost: builder.query({
      query: postId => `/posts/${postId}`,
      providesTags: (result, error, arg) => [{ type: 'Post', id: arg }]
    }),
    addNewPost: builder.mutation({
      query: initialPost => ({
        url: '/posts',
        method: 'POST',
        body: initialPost
      }),
      invalidatesTags: ['Post']
    }),
    editPost: builder.mutation({
      query: post => ({
        url: `posts/${post.id}`,
        method: 'PATCH',
        body: post
      }),
      invalidatesTags: (result, error, arg) => [{ type: 'Post', id: arg.id }]
    })
  })
})
It's possible for the result argument in these callbacks to be undefined if the response has no data or there's an error, so we have to handle that safely. For getPosts we can do that by using a default argument array value to map over, and for getPost we're already returning a single-item array based on the argument ID. For editPost, we know the ID of the post from the partial post object that was passed into the trigger function, so we can read it from there.
With those changes in place, let's go back and try editing a post again, with the Network tab open in the browser DevTools.
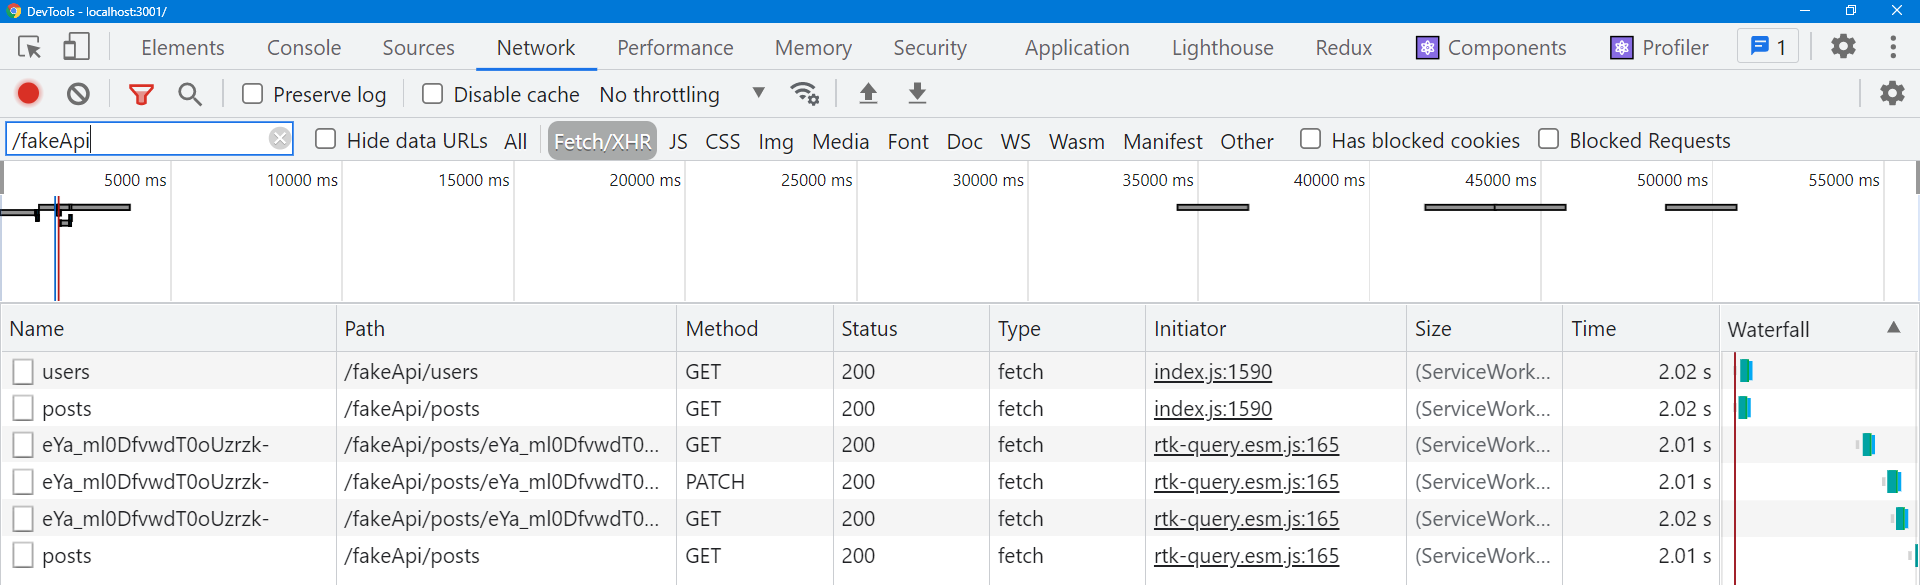
When we save the edited post this time, we should see two requests happen back-to-back:
- The
PATCH /posts/:postIdfrom theeditPostmutation - A
GET /posts/:postIdas thegetPostquery is refetched
Then, if we click back to the main "Posts" tab, we should also see:
- A
GET /postsas thegetPostsquery is refetched
Because we provided the relationships between the endpoints using tags, RTK Query knew that it needed to refetch the individual post and the list of posts when we made that edit and the specific tag with that ID was invalidated - no further changes needed! Meanwhile, as we were editing the post, the cache removal timer for the getPosts data expired, so it was removed from the cache. When we opened the <PostsList> component again, RTK Query saw that it did not have the data in cache and refetched it.
There is one caveat here. By specifying a plain 'Post' tag in getPosts and invalidating it in addNewPost, we actually end up forcing a refetch of all individual posts as well. If we really want to just refetch the list of posts for the getPost endpoint, you can include an additional tag with an arbitrary ID, like {type: 'Post', id: 'LIST'}, and invalidate that tag instead. The RTK Query docs have a table that describes what will happen if certain general/specific tag combinations are invalidated.
RTK Query has many other options for controlling when and how to refetch data, including "conditional fetching", "lazy queries", and "prefetching", and query definitions can be customized in a variety of ways. See the RTK Query usage guide docs for more details on using these features:
Managing Users Data
We've finished converting our posts data management over to use RTK Query. Next up, we'll convert the list of users.
Since we've already seen how to use the RTK Query hooks for fetching and reading data, for this section we're going to try a different approach. RTK Query's core API is UI-agnostic and can be used with any UI layer, not just React. Normally you should stick with using the hooks, but here we're going to work with the user data using just the RTK Query core API so you can see how to use it.
Fetching Users Manually
We're currently defining a fetchUsers async thunk in usersSlice.js, and dispatching that thunk manually in index.js so that the list of users is available as soon as possible. We can do that same process using RTK Query.
We'll start by defining a getUsers query endpoint in apiSlice.js, similar to our existing endpoints. We'll export the useGetUsersQuery hook just for consistency, but for now we're not going to use it.
export const apiSlice = createApi({
  reducerPath: 'api',
  baseQuery: fetchBaseQuery({ baseUrl: '/fakeApi' }),
  tagTypes: ['Post'],
  endpoints: builder => ({
    // omit other endpoints

    getUsers: builder.query({
      query: () => '/users'
    })
  })
})

export const {
  useGetPostsQuery,
  useGetPostQuery,
  useGetUsersQuery,
  useAddNewPostMutation,
  useEditPostMutation
} = apiSlice
If we inspect the API slice object, it includes an endpoints field, with one endpoint object inside for each endpoint we've defined.

Each endpoint object contains:
- The same primary query/mutation hook that we exported from the root API slice object, but named as
useQueryoruseMutation - For query endpoints, an additional set of query hooks for scenarios like "lazy queries" or partial subscriptions
- A set of "matcher" utilities to check for the
pending/fulfilled/rejectedactions dispatched by requests for this endpoint - An
initiatethunk that triggers a request for this endpoint - A
selectfunction that creates memoized selectors that can retrieve the cached result data + status entries for this endpoint
If we want to fetch the list of users outside of React, we can dispatch the getUsers.initiate() thunk in our index file:
// omit other imports
import { apiSlice } from './features/api/apiSlice'

async function main() {
  // Start our mock API server
  await worker.start({ onUnhandledRequest: 'bypass' })

  store.dispatch(apiSlice.endpoints.getUsers.initiate())

  ReactDOM.render(
    <React.StrictMode>
      <Provider store={store}>
        <App />
      </Provider>
    </React.StrictMode>,
    document.getElementById('root')
  )
}
main()
This dispatch happens automatically inside the query hooks, but we can start it manually if needed.
Manually dispatching an RTKQ request thunk will create a subscription entry, but it's then up to you to unsubscribe from that data later - otherwise the data stays in the cache permanently. In this case, we always need user data, so we can skip unsubscribing.
Selecting Users Data
We currently have selectors like selectAllUsers and selectUserById that are generated by our createEntityAdapter users adapter, and are reading from state.users. If we reload the page, all of our user-related display is broken because the state.users slice has no data. Now that we're fetching data for RTK Query's cache, we should replace those selectors with equivalents that read from the cache instead.
The endpoint.select() function in the API slice endpoints will create a new memoized selector function every time we call it. select() takes a cache key as its argument, and this must be the same cache key that you pass as an argument to either the query hooks or the initiate() thunk. The generated selector uses that cache key to know exactly which cached result it should return from the cache state in the store.
In this case, our getUsers endpoint doesn't need any parameters - we always fetch the entire list of users. So, we can create a cache selector with no argument, and the cache key becomes undefined.
import {
  createSlice,
  createEntityAdapter,
  createSelector
} from '@reduxjs/toolkit'

import { apiSlice } from '../api/apiSlice'

/* Temporarily ignore adapter - we'll use this again shortly
const usersAdapter = createEntityAdapter()

const initialState = usersAdapter.getInitialState()
*/

// Calling `someEndpoint.select(someArg)` generates a new selector that will return
// the query result object for a query with those parameters.
// To generate a selector for a specific query argument, call `select(theQueryArg)`.
// In this case, the users query has no params, so we don't pass anything to select()
export const selectUsersResult = apiSlice.endpoints.getUsers.select()

const emptyUsers = []

export const selectAllUsers = createSelector(
  selectUsersResult,
  usersResult => usersResult?.data ?? emptyUsers
)

export const selectUserById = createSelector(
  selectAllUsers,
  (state, userId) => userId,
  (users, userId) => users.find(user => user.id === userId)
)

/* Temporarily ignore selectors - we'll come back to this later
export const {
  selectAll: selectAllUsers,
  selectById: selectUserById,
} = usersAdapter.getSelectors((state) => state.users)
*/
Once we have that initial selectUsersResult selector, we can replace the existing selectAllUsers selector with one that returns the array of users from the cache result, and then replace selectUserById with one that finds the right user from that array.
For now we're going to comment out those selectors from the usersAdapter - we're going to make another change later that switches back to using those.
Our components are already importing selectAllUsers and selectUserById, so this change should just work! Try refreshing the page and clicking through the posts list and single post view. The correct user names should appear in each displayed post, and in the dropdown in the <AddPostForm>.
Since the usersSlice is no longer even being used at all, we can go ahead and delete the createSlice call from this file, and remove users: usersReducer from our store setup. We've still got a couple bits of code that reference postsSlice, so we can't quite remove that yet - we'll get to that shortly.
Injecting Endpoints
It's common for larger applications to "code-split" features into separate bundles, and then "lazy load" them on demand as the feature is used for the first time. We said that RTK Query normally has a single "API slice" per application, and so far we've defined all of our endpoints directly in apiSlice.js. What happens if we want to code-split some of our endpoint definitions, or move them into another file to keep the API slice file from getting too big?
RTK Query supports splitting out endpoint definitions with apiSlice.injectEndpoints(). That way, we can still have a single API slice with a single middleware and cache reducer, but we can move the definition of some endpoints to other files. This enables code-splitting scenarios, as well as co-locating some endpoints alongside feature folders if desired.
To illustrate this process, let's switch the getUsers endpoint to be injected in usersSlice.js, instead of defined in apiSlice.js.
We're already importing apiSlice into usersSlice.js so that we can access the getUsers endpoint, so we can switch to calling apiSlice.injectEndpoints() here instead.
import { apiSlice } from '../api/apiSlice'

export const extendedApiSlice = apiSlice.injectEndpoints({
  endpoints: builder => ({
    getUsers: builder.query({
      query: () => '/users'
    })
  })
})

export const { useGetUsersQuery } = extendedApiSlice

export const selectUsersResult = extendedApiSlice.endpoints.getUsers.select()
injectEndpoints() mutates the original API slice object to add the additional endpoint definitions, and then returns it. The actual caching reducer and middleware that we originally added to the store still work okay as-is. At this point, apiSlice and extendedApiSlice are the same object, but it can be helpful to refer to the extendedApiSlice object instead of apiSlice here as a reminder to ourselves. (This is more important if you're using TypeScript, because only the extendedApiSlice value has the added types for the new endpoints.)
At the moment, the only file that references the getUsers endpoint is our index file, which is dispatching the initiate thunk. We need to update that to import the extended API slice instead:
  // omit other imports
- import { apiSlice } from './features/api/apiSlice'
+ import { extendedApiSlice } from './features/users/usersSlice'


  async function main() {
    // Start our mock API server
    await worker.start({ onUnhandledRequest: 'bypass' })


-   store.dispatch(apiSlice.endpoints.getUsers.initiate())
+   store.dispatch(extendedApiSlice.endpoints.getUsers.initiate())


    ReactDOM.render(
      <React.StrictMode>
        <Provider store={store}>
          <App />
        </Provider>
      </React.StrictMode>,
      document.getElementById('root')
    )
  }
  main()
Alternately, you could just export the specific endpoints themselves from the slice file.
Manipulating Response Data
So far, all of our query endpoints have simply stored the response data from the server exactly as it was received in the body. getPosts and getUsers both expect the server to return an array, and getPost expects the individual Post object as the body.
It's common for clients to need to extract pieces of data from the server response, or to transform the data in some way before caching it. For example, what if the /getPost request returns a body like {post: {id}}, with the data nested?
There's a couple ways that we could handle this conceptually. One option would be to extract the responseData.post field and store that in the cache, instead of the entire body. Another would be to store the entire response data in the cache, but have our components specify just a specific piece of that cached data that they need.
Transforming Responses
Endpoints can define a transformResponse handler that can extract or modify the data received from the server before it's cached. For the getPost example, we could have transformResponse: (responseData) => responseData.post, and it would cache just the actual Post object instead of the entire body of the response.
In Part 6: Performance and Normalization, we discussed reasons why it's useful to store data in a normalized structure. In particular, it lets us look up and update items based on an ID, rather than having to loop over an array to find the right item.
Our selectUserById selector currently has to loop over the cached array of users to find the right User object. If we were to transform the response data to be stored using a normalized approach, we could simplify that to directly find the user by ID.
We were previously using createEntityAdapter in usersSlice to manage normalized users data. We can integrate createEntityAdapter into our extendedApiSlice, and actually use createEntityAdapter to transform the data before it's cached. We'll uncomment the usersAdapter lines we originally had, and use its update functions and selectors again.
import { apiSlice } from '../api/apiSlice'

const usersAdapter = createEntityAdapter()

const initialState = usersAdapter.getInitialState()

export const extendedApiSlice = apiSlice.injectEndpoints({
  endpoints: builder => ({
    getUsers: builder.query({
      query: () => '/users',
      transformResponse: responseData => {
        return usersAdapter.setAll(initialState, responseData)
      }
    })
  })
})

export const { useGetUsersQuery } = extendedApiSlice

// Calling `someEndpoint.select(someArg)` generates a new selector that will return
// the query result object for a query with those parameters.
// To generate a selector for a specific query argument, call `select(theQueryArg)`.
// In this case, the users query has no params, so we don't pass anything to select()
export const selectUsersResult = extendedApiSlice.endpoints.getUsers.select()

const selectUsersData = createSelector(
  selectUsersResult,
  usersResult => usersResult.data
)

export const { selectAll: selectAllUsers, selectById: selectUserById } =
  usersAdapter.getSelectors(state => selectUsersData(state) ?? initialState)
We've added a transformResponse option to the getUsers endpoint. It receives the entire response data body as its argument, and should return the actual data to be cached. By calling usersAdapter.setAll(initialState, responseData), it will return the standard {ids: [], entities: {}} normalized data structure containing all of the received items.
The adapter.getSelectors() function needs to be given an "input selector" so it knows where to find that normalized data. In this case, the data is nested down inside the RTK Query cache reducer, so we select the right field out of the cache state.
Normalized vs Document Caches
It's worth stepping back for a minute to discuss what we just did further.
You may have heard the term "normalized cache" in relation to other data fetching libraries like Apollo. It's important to understand that RTK Query uses a "document cache" approach, not a "normalized cache".
A fully normalized cache tries to deduplicate similar items across all queries, based on item type and ID. As an example, say that we have an API slice with getTodos and getTodo endpoints, and our components make the following queries:
getTodos()getTodos({filter: 'odd'})getTodo({id: 1})
Each of these query results would include a Todo object that looks like {id: 1}.
In a fully normalized de-duplicating cache, only a single copy of this Todo object would be stored. However, RTK Query saves each query result independently in the cache. So, this would result in three separate copies of this Todo being cached in the Redux store. However, if all the endpoints are consistently providing the same tags (such as {type: 'Todo', id: 1}), then invalidating that tag will force all the matching endpoints to refetch their data for consistency.
RTK Query deliberately does not implement a cache that would deduplicate identical items across multiple requests. There are several reasons for this:
- A fully normalized shared-across-queries cache is a hard problem to solve
- We don't have the time, resources, or interest in trying to solve that right now
- In many cases, simply re-fetching data when it's invalidated works well and is easier to understand
- At a minimum, RTKQ can help solve the general use case of "fetch some data", which is a big pain point for a lot of people
In comparison, we just normalized the response data for the getUsers endpoint, in that it's being stored as an {[id]: value} lookup table. However, this is not the same thing as a "normalized cache" - we only transformed how this one response is stored rather than deduplicating results across endpoints or requests.
Selecting Values from Results
The last component that is reading from the old postsSlice is <UserPage>, which filters the list of posts based on the current user. We've already seen that we can get the entire list of posts with useGetPostsQuery() and then transform it in the component, such as sorting inside of a useMemo. The query hooks also give us the ability to select pieces of the cached state by providing a selectFromResult option, and only re-render when the selected pieces change.
We can use selectFromResult to have <UserPage> read just a filtered list of posts from the cache. However, in order for selectFromResult to avoid unnecessary re-renders, we need to ensure that whatever data we extract is memoized correctly. To do this, we should create a new selector instance that the <UsersPage> component can reuse every time it renders, so that the selector memoizes the result based on its inputs.
import { createSelector } from '@reduxjs/toolkit'

import { selectUserById } from '../users/usersSlice'
import { useGetPostsQuery } from '../api/apiSlice'

export const UserPage = ({ match }) => {
  const { userId } = match.params

  const user = useSelector(state => selectUserById(state, userId))

  const selectPostsForUser = useMemo(() => {
    const emptyArray = []
    // Return a unique selector instance for this page so that
    // the filtered results are correctly memoized
    return createSelector(
      res => res.data,
      (res, userId) => userId,
      (data, userId) => data?.filter(post => post.user === userId) ?? emptyArray
    )
  }, [])

  // Use the same posts query, but extract only part of its data
  const { postsForUser } = useGetPostsQuery(undefined, {
    selectFromResult: result => ({
      // We can optionally include the other metadata fields from the result here
      ...result,
      // Include a field called `postsForUser` in the hook result object,
      // which will be a filtered list of posts
      postsForUser: selectPostsForUser(result, userId)
    })
  })

  // omit rendering logic
}
There's a key difference with the memoized selector function we've created here. Normally, selectors expect the entire Redux state as their first argument, and extract or derive a value from state. However, in this case we're only dealing with the "result" value that is kept in the cache. The result object has a data field inside with the actual values we need, as well as some of the request metadata fields.
Our selectFromResult callback receives the result object containing the original request metadata and the data from the server, and should return some extracted or derived values. Because query hooks add an additional refetch method to whatever is returned here, it's preferable to always return an object from selectFromResult with the fields inside that you need.
Since result is being kept in the Redux store, we can't mutate it - we need to return a new object. The query hook will do a "shallow" comparison on this returned object, and only re-render the component if one of the fields has changed. We can optimize re-renders by only returning the specific fields needed by this component - if we don't need the rest of the metadata flags, we could omit them entirely. If you do need them, you can spread the original result value to include them in the output.
In this case, we'll call the field postsForUser, and we can destructure that new field from the hook result. By calling selectPostsForUser(result, userId) every time, it will memoize the filtered array and only recalculate it if the fetched data or the user ID changes.
Comparing Transformation Approaches
We've now seen three different ways that we can manage transforming responses:
- Keep original response in cache, read full result in component and derive values
- Keep original response in cache, read derived result with
selectFromResult - Transform response before storing in cache
Each of these approaches can be useful in different situations. Here's some suggestions for when you should consider using them:
transformResponse: all consumers of the endpoint want a specific format, such as normalizing the response to enable faster lookups by IDselectFromResult: some consumers of the endpoint only need partial data, such as a filtered list- per-component /
useMemo: when only some specific components need to transform the cached data
Advanced Cache Updates
We've completed updating our posts and users data, so all that's left is working with reactions and notifications. Switching these to use RTK Query will give us a chance to try out some of the advanced techniques available for working with RTK Query's cached data, and allow us to provide a better experience for our users.
Persisting Reactions
Originally, we only tracked reactions on the client side and did not persist them to the server. Let's add a new addReaction mutation and use that to update the corresponding Post on the server every time the user clicks a reaction button.
export const apiSlice = createApi({
  reducerPath: 'api',
  baseQuery: fetchBaseQuery({ baseUrl: '/fakeApi' }),
  tagTypes: ['Post'],
  endpoints: builder => ({
    // omit other endpoints
    addReaction: builder.mutation({
      query: ({ postId, reaction }) => ({
        url: `posts/${postId}/reactions`,
        method: 'POST',
        // In a real app, we'd probably need to base this on user ID somehow
        // so that a user can't do the same reaction more than once
        body: { reaction }
      }),
      invalidatesTags: (result, error, arg) => [
        { type: 'Post', id: arg.postId }
      ]
    })
  })
})

export const {
  useGetPostsQuery,
  useGetPostQuery,
  useAddNewPostMutation,
  useEditPostMutation,
  useAddReactionMutation
} = apiSlice
Similar to our other mutations, we take some parameters and make a request to the server, with some data in the body of the request. Since this example app is small, we'll just give the name of the reaction, and let the server increment the counter for that reaction type on this post.
We already know that we need to refetch this post in order to see any of the data change on the client, so we can invalidate this specific Post entry based on its ID.
With that in place, let's update <ReactionButtons> to use this mutation.
import React from 'react'

import { useAddReactionMutation } from '../api/apiSlice'

const reactionEmoji = {
  thumbsUp: '👍',
  hooray: '🎉',
  heart: '❤️',
  rocket: '🚀',
  eyes: '👀'
}

export const ReactionButtons = ({ post }) => {
  const [addReaction] = useAddReactionMutation()

  const reactionButtons = Object.entries(reactionEmoji).map(
    ([reactionName, emoji]) => {
      return (
        <button
          key={reactionName}
          type="button"
          className="muted-button reaction-button"
          onClick={() => {
            addReaction({ postId: post.id, reaction: reactionName })
          }}
        >
          {emoji} {post.reactions[reactionName]}
        </button>
      )
    }
  )

  return <div>{reactionButtons}</div>
}
Let's see this in action! Go to the main <PostsList>, and click one of the reactions to see what happens.
Uh-oh. The entire <PostsList> component was grayed out, because we just refetched the entire list of posts in response to that one post being updated. This is deliberately more visible because our mock API server is set to have a 2-second delay before responding, but even if the response is faster, this still isn't a good user experience.
Implementing Optimistic Updates
For a small update like adding a reaction, we probably don't need to re-fetch the entire list of posts. Instead, we could try just updating the already-cached data on the client to match what we expect to have happen on the server. Also, if we update the cache immediately, the user gets instant feedback when they click the button instead of having to wait for the response to come back. This approach of updating client state right away is called an "optimistic update", and it's a common pattern in web apps.
RTK Query lets you implement optimistic updates by modifying the client-side cache based on "request lifecycle" handlers. Endpoints can define an onQueryStarted function that will be called when a request starts, and we can run additional logic in that handler.
export const apiSlice = createApi({
  reducerPath: 'api',
  baseQuery: fetchBaseQuery({ baseUrl: '/fakeApi' }),
  tagTypes: ['Post'],
  endpoints: builder => ({
    // omit other endpoints

    addReaction: builder.mutation({
      query: ({ postId, reaction }) => ({
        url: `posts/${postId}/reactions`,
        method: 'POST',
        // In a real app, we'd probably need to base this on user ID somehow
        // so that a user can't do the same reaction more than once
        body: { reaction }
      }),
      async onQueryStarted({ postId, reaction }, { dispatch, queryFulfilled }) {
        // `updateQueryData` requires the endpoint name and cache key arguments,
        // so it knows which piece of cache state to update
        const patchResult = dispatch(
          apiSlice.util.updateQueryData('getPosts', undefined, draft => {
            // The `draft` is Immer-wrapped and can be "mutated" like in createSlice
            const post = draft.find(post => post.id === postId)
            if (post) {
              post.reactions[reaction]++
            }
          })
        )
        try {
          await queryFulfilled
        } catch {
          patchResult.undo()
        }
      }
    })
  })
})
The onQueryStarted handler receives two parameters. The first is the cache key arg that was passed when the request started. The second is an object that contains some of the same fields as the thunkApi in createAsyncThunk ( {dispatch, getState, extra, requestId}), but also a Promise called queryFulfilled. This Promise will resolve when the request returns, and either fulfill or reject based on the request.
The API slice object includes a updateQueryData util function that lets us update cached values. It takes three arguments: the name of the endpoint to update, the same cache key value used to identify the specific cached data, and a callback that updates the cached data. updateQueryData uses Immer, so you can "mutate" the drafted cache data the same way you would in createSlice.
We can implement the optimistic update by finding the specific Post entry in the getPosts cache, and "mutating" it to increment the reaction counter.
updateQueryData generates an action object with a patch diff of the changes we made. When we dispatch that action, the return value is a patchResult object. If we call patchResult.undo(), it automatically dispatches an action that reverses the patch diff changes.
By default, we expect that the request will succeed. In case the request fails, we can await queryFulfilled, catch a failure, and undo the patch changes to revert the optimistic update.
For this case, we've also removed the invalidatesTags line we'd just added, since we don't want to refetch the posts when we click a reaction button.
Now, if we click several times on a reaction button quickly, we should see the number increment in the UI each time. If we look at the Network tab, we'll also see each individual request go out to the server as well.
Streaming Cache Updates
Our final feature is the notifications tab. When we originally built this feature in Part 6, we said that "in a real app, the server would push updates to our client every time something happens". We initially faked that feature by adding a "Refresh Notifications" button, and having it make an HTTP GET request for more notifications entries.
It's common for apps to make an initial request to fetch data from the server, and then open up a Websocket connection to receive additional updates over time. RTK Query provides an onCacheEntryAdded endpoint lifecycle handler that lets us implement "streaming updates" to cached data. We'll use that capability to implement a more realistic approach to managing notifications.
Our src/api/server.js file has a mock Websocket server already configured, similar to the mock HTTP server. We'll write a new getNotifications endpoint that fetches the initial list of notifications, and then establishes the Websocket connection to listen for future updates. We still need to manually tell the mock server when to send new notifications, so we'll continue faking that by having a button we click to force the update.
We'll inject the getNotifications endpoint in notificationsSlice like we did with getUsers, just to show it's possible.
import { forceGenerateNotifications } from '../../api/server'
import { apiSlice } from '../api/apiSlice'

export const extendedApi = apiSlice.injectEndpoints({
  endpoints: builder => ({
    getNotifications: builder.query({
      query: () => '/notifications',
      async onCacheEntryAdded(
        arg,
        { updateCachedData, cacheDataLoaded, cacheEntryRemoved }
      ) {
        // create a websocket connection when the cache subscription starts
        const ws = new WebSocket('ws://localhost')
        try {
          // wait for the initial query to resolve before proceeding
          await cacheDataLoaded

          // when data is received from the socket connection to the server,
          // update our query result with the received message
          const listener = event => {
            const message = JSON.parse(event.data)
            switch (message.type) {
              case 'notifications': {
                updateCachedData(draft => {
                  // Insert all received notifications from the websocket
                  // into the existing RTKQ cache array
                  draft.push(...message.payload)
                  draft.sort((a, b) => b.date.localeCompare(a.date))
                })
                break
              }
              default:
                break
            }
          }

          ws.addEventListener('message', listener)
        } catch {
          // no-op in case `cacheEntryRemoved` resolves before `cacheDataLoaded`,
          // in which case `cacheDataLoaded` will throw
        }
        // cacheEntryRemoved will resolve when the cache subscription is no longer active
        await cacheEntryRemoved
        // perform cleanup steps once the `cacheEntryRemoved` promise resolves
        ws.close()
      }
    })
  })
})

export const { useGetNotificationsQuery } = extendedApi

const emptyNotifications = []

export const selectNotificationsResult =
  extendedApi.endpoints.getNotifications.select()

const selectNotificationsData = createSelector(
  selectNotificationsResult,
  notificationsResult => notificationsResult.data ?? emptyNotifications
)

export const fetchNotificationsWebsocket = () => (dispatch, getState) => {
  const allNotifications = selectNotificationsData(getState())
  const [latestNotification] = allNotifications
  const latestTimestamp = latestNotification?.date ?? ''
  // Hardcode a call to the mock server to simulate a server push scenario over websockets
  forceGenerateNotifications(latestTimestamp)
}

// omit existing slice code
Like with onQueryStarted, the onCacheEntryAdded lifecycle handler receives the arg cache key as its first parameter, and an options object with the thunkApi values as the second parameter. The options object also contains an updateCachedData util function, and two lifecycle Promises - cacheDataLoaded and cacheEntryRemoved. cacheDataLoaded resolves when the initial data for this subscription is added to the store. This happens when the first subscription for this endpoint + cache key is added. As long as 1+ subscribers for the data are still active, the cache entry is kept alive. When the number of subscribers goes to 0 and the cache lifetime timer expires, the cache entry will be removed, and cacheEntryRemoved will resolve. Typically, the usage pattern is:
await cacheDataLoadedright away- Create a server-side data subscription like a Websocket
- When an update is received, use
updateCachedDatato "mutate" the cached values based on the update await cacheEntryRemovedat the end- Clean up subscriptions afterwwards
Our mock Websocket server file exposes a forceGenerateNotifications method to mimic pushing data out to the client. That depends on knowing the most recent notification timestamp, so we add a thunk we can dispatch that reads the latest timestamp from the cache state and tells the mock server to generate newer notifications.
Inside of onCacheEntryAdded, we create a real Websocket connection to localhost. In a real app, this could be any kind of external subscription or polling connection you need to receive ongoing updates. Whenever the mock server sends us an update, we push all of the received notifications into the cache and re-sort it.
When the cache entry is removed, we clean up the Websocket subscription. In this app, the notifications cache entry will never be removed because we never unsubscribe from the data, but it's important to see how the cleanup would work for a real app.
Tracking Client-Side State
We need to make one final set of updates. Our <Navbar> component has to initiate the fetching of notifications, and <NotificationsList> needs to show the notification entries with the correct read/unread status. However, we were previously adding the read/unread fields on the client side in our notificationsSlice reducer when we received the entries, and now the notification entries are being kept in the RTK Query cache.
We can rewrite notificationsSlice so that it listens for any received notifications, and tracks some additional state on the client side for each notification entry.
There's two cases when new notification entries are received: when we fetch the initial list over HTTP, and when we receive an update pushed over the Websocket connection. Ideally, we want to use the same logic in response to both cases. We can use RTK's "matching utilities" to write one case reducer that runs in response to multiple action types.
Let' see what notificationsSlice looks like after we add this logic.
import {
  createAction,
  createSlice,
  createEntityAdapter,
  createSelector,
  isAnyOf
} from '@reduxjs/toolkit'

import { forceGenerateNotifications } from '../../api/server'
import { apiSlice } from '../api/apiSlice'

const notificationsReceived = createAction(
  'notifications/notificationsReceived'
)

export const extendedApi = apiSlice.injectEndpoints({
  endpoints: builder => ({
    getNotifications: builder.query({
      query: () => '/notifications',
      async onCacheEntryAdded(
        arg,
        { updateCachedData, cacheDataLoaded, cacheEntryRemoved, dispatch }
      ) {
        // create a websocket connection when the cache subscription starts
        const ws = new WebSocket('ws://localhost')
        try {
          // wait for the initial query to resolve before proceeding
          await cacheDataLoaded

          // when data is received from the socket connection to the server,
          // update our query result with the received message
          const listener = event => {
            const message = JSON.parse(event.data)
            switch (message.type) {
              case 'notifications': {
                updateCachedData(draft => {
                  // Insert all received notifications from the websocket
                  // into the existing RTKQ cache array
                  draft.push(...message.payload)
                  draft.sort((a, b) => b.date.localeCompare(a.date))
                })
                // Dispatch an additional action so we can track "read" state
                dispatch(notificationsReceived(message.payload))
                break
              }
              default:
                break
            }
          }

          ws.addEventListener('message', listener)
        } catch {
          // no-op in case `cacheEntryRemoved` resolves before `cacheDataLoaded`,
          // in which case `cacheDataLoaded` will throw
        }
        // cacheEntryRemoved will resolve when the cache subscription is no longer active
        await cacheEntryRemoved
        // perform cleanup steps once the `cacheEntryRemoved` promise resolves
        ws.close()
      }
    })
  })
})

export const { useGetNotificationsQuery } = extendedApi

// omit selectors and websocket thunk

const notificationsAdapter = createEntityAdapter()

const matchNotificationsReceived = isAnyOf(
  notificationsReceived,
  extendedApi.endpoints.getNotifications.matchFulfilled
)

const notificationsSlice = createSlice({
  name: 'notifications',
  initialState: notificationsAdapter.getInitialState(),
  reducers: {
    allNotificationsRead(state, action) {
      Object.values(state.entities).forEach(notification => {
        notification.read = true
      })
    }
  },
  extraReducers(builder) {
    builder.addMatcher(matchNotificationsReceived, (state, action) => {
      // Add client-side metadata for tracking new notifications
      const notificationsMetadata = action.payload.map(notification => ({
        id: notification.id,
        read: false,
        isNew: true
      }))

      Object.values(state.entities).forEach(notification => {
        // Any notifications we've read are no longer new
        notification.isNew = !notification.read
      })

      notificationsAdapter.upsertMany(state, notificationsMetadata)
    })
  }
})

export const { allNotificationsRead } = notificationsSlice.actions

export default notificationsSlice.reducer

export const {
  selectAll: selectNotificationsMetadata,
  selectEntities: selectMetadataEntities
} = notificationsAdapter.getSelectors(state => state.notifications)
There's a lot going on, but let's break down the changes one at a time.
There isn't currently a good way for the notificationsSlice reducer to know when we've received an updated list of new notifications via the Websocket. So, we'll import createAction, define a new action type specifically for the "received some notifications" case, and dispatch that action after updating the cache state.
We want to run the same "add read/new metadata" logic for both the "fulfilled getNotifications" action and the "received from Websocket" action. We can create a new "matcher" function by calling isAnyOf() and passing in each of those action creators. The matchNotificationsReceived matcher function will return true if the current action matches either of those types.
Previously, we had a normalized lookup table for all of our notifications, and the UI selected those as a single sorted array. We're going to repurpose this slice to instead store "metadata" objects that describe the read/unread status.
We can use the builder.addMatcher() API inside of extraReducers to add a case reducer that runs whenever we match one of those two action types. Inside of there, we add a new "read/isNew" metadata entry that corresponds to each notification by ID, and store that inside of notificationsSlice.
Finally, we need change the selectors we're exporting from this slice. Instead of exporting selectAll as selectAllNotifications, we're going to export it as selectNotificationsMetadata. It still returns an array of the values from the normalized state, but we're changing the name since the items themselves have changed. We're also going to export the selectEntities selector, which returns the lookup table object itself, as selectMetadataEntities. That will be useful when we try to use this data in the UI.
With those changes in place, we can update our UI components to fetch and display notifications.
import React from 'react'
import { useDispatch, useSelector } from 'react-redux'
import { Link } from 'react-router-dom'

import {
  fetchNotificationsWebsocket,
  selectNotificationsMetadata,
  useGetNotificationsQuery
} from '../features/notifications/notificationsSlice'

export const Navbar = () => {
  const dispatch = useDispatch()

  // Trigger initial fetch of notifications and keep the websocket open to receive updates
  useGetNotificationsQuery()

  const notificationsMetadata = useSelector(selectNotificationsMetadata)
  const numUnreadNotifications = notificationsMetadata.filter(
    n => !n.read
  ).length

  const fetchNewNotifications = () => {
    dispatch(fetchNotificationsWebsocket())
  }

  let unreadNotificationsBadge

  if (numUnreadNotifications > 0) {
    unreadNotificationsBadge = (
      <span className="badge">{numUnreadNotifications}</span>
    )
  }

  // omit rendering logic
}
In <NavBar>, we trigger the initial notifications fetch with useGetNotificationsQuery(), and switch to reading the metadata objects from state.notificationsSlice. Clicking the "Refresh" button now triggers the mock Websocket server to push out another set of notifications.
Our <NotificationsList> similarly switches over to reading the cached data and metadata.
import {
  useGetNotificationsQuery,
  allNotificationsRead,
  selectMetadataEntities,
} from './notificationsSlice'

export const NotificationsList = () => {
  const dispatch = useDispatch()
  const { data: notifications = [] } = useGetNotificationsQuery()
  const notificationsMetadata = useSelector(selectMetadataEntities)
  const users = useSelector(selectAllUsers)

  useLayoutEffect(() => {
    dispatch(allNotificationsRead())
  })

  const renderedNotifications = notifications.map((notification) => {
    const date = parseISO(notification.date)
    const timeAgo = formatDistanceToNow(date)
    const user = users.find((user) => user.id === notification.user) || {
      name: 'Unknown User',
    }

    const metadata = notificationsMetadata[notification.id]

    const notificationClassname = classnames('notification', {
      new: metadata.isNew,
    })

  // omit rendering logic
}
We read the list of notifications from cache and the new metadata entries from the notificationsSlice, and continue displaying them the same way as before.
As a final step, we can do some additional cleanup here - the postsSlice is no longer being used, so that can be removed entirely.
With that, we've finished converting our application over to use RTK Query! All of the data fetching has been switched over to use RTKQ, and we've improved the user experience by adding optimistic updates and streaming updates.
What You've Learned
As we've seen, RTK Query includes some powerful options for controlling how we manage cached data. While you may not need all of these options right away, they provide flexibility and key capabilities to help implement specific application behaviors.
Let's take one last look at the whole application in action:
- Specific cache tags can be used for finer-grained cache invalidation
- Cache tags can be either
'Post'or{type: 'Post', id} - Endpoints can provide or invalidate cache tags based on results and arg cache keys
- Cache tags can be either
- RTK Query's APIs are UI-agnostic and can be used outside of React
- Endpoint objects include functions for initating requests, generating result selectors, and matching request action objects
- Responses can be transformed in different ways as needed
- Endpoints can define a
transformResponsecallback to modify the data before caching - Hooks can be given a
selectFromResultoption to extract/transform data - Components can read an entire value and transform with
useMemo
- Endpoints can define a
- RTK Query has advanced options for manipulating cached data for better user experience
- The
onQueryStartedlifecycle can be used for optimistic updates by updating cache immediately before a request returns - The
onCacheEntryAddedlifecycle can be used for streaming updates by updating cache over time based on server push connections
- The
What's Next?
Congratulations, you've completed the Redux Essentials tutorial! You should now have a solid understanding of what Redux Toolkit and React-Redux are, how to write and organize Redux logic, Redux data flow and usage with React, and how to use APIs like configureStore and createSlice. You should also see how RTK Query can simplify the process of fetching and using cached data.
The "What's Next?" section in Part 6 has links to additional resources for app ideas, tutorials, and documentation.
For more details on using RTK Query, see the RTK Query usage guide docs and API reference.
If you're looking for help with Redux questions, come join the #redux channel in the Reactiflux server on Discord.
Thanks for reading through this tutorial, and we hope you enjoy building applications with Redux!